CASE a Card
When I started making cards, I had no idea what people were talking about when they said they “case a card”. I’ve since learned, there are a few different sayings that work with C-A-S-E, but mostly I hear “Copy And Share Everywhere”. I’ve cased quite a few cards since then, but I especially like flipping through a catalog and picking some cards out to copy. I’ve looked up the “recipes” and tried to copy exactly… but I always end up changing something. Everyone has their own personal preferences – the things that appeal to YOUR eye – so you should always use recipes as a starting point. Lately, I have taken to just guessing about the products, colors, sizes, etc. when copying cards.
So, for this post, I’m going to take you to the January – April 2024 Stampin’ Up Mini Catalog. I decided to pick out some cards to CASE. There were a couple of problems with this. First, there were WAY TOO MANY to choose from!! Second, it made me want to buy more products!!
Not BAD problems, but there you go. I decided to place some limitations on my choices, so I chose from just the bundle pages – from page 67 through 73.
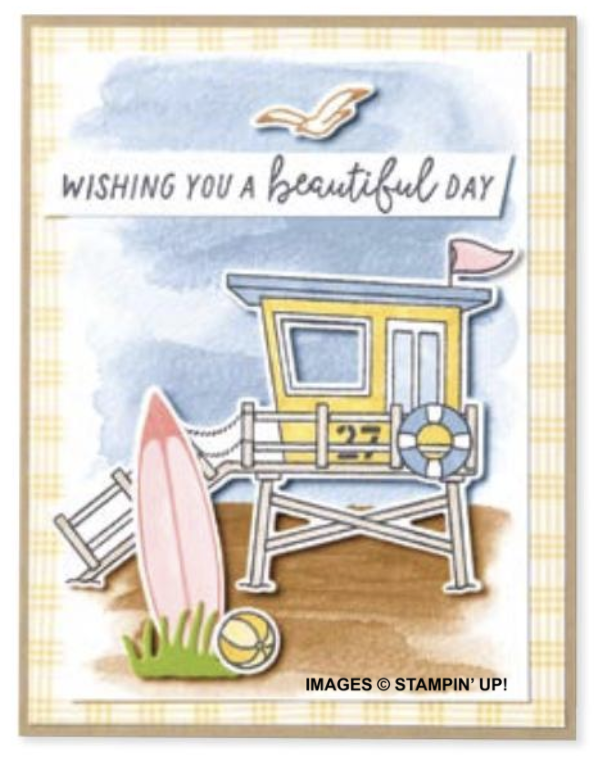
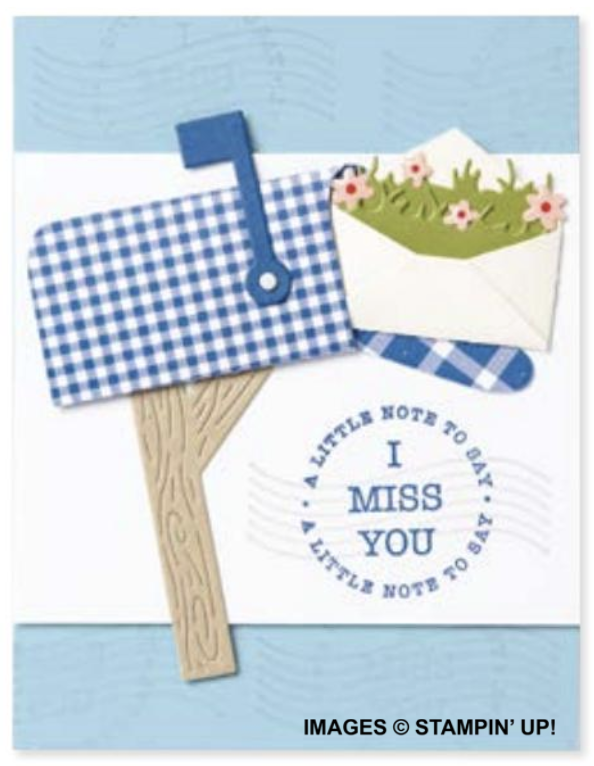
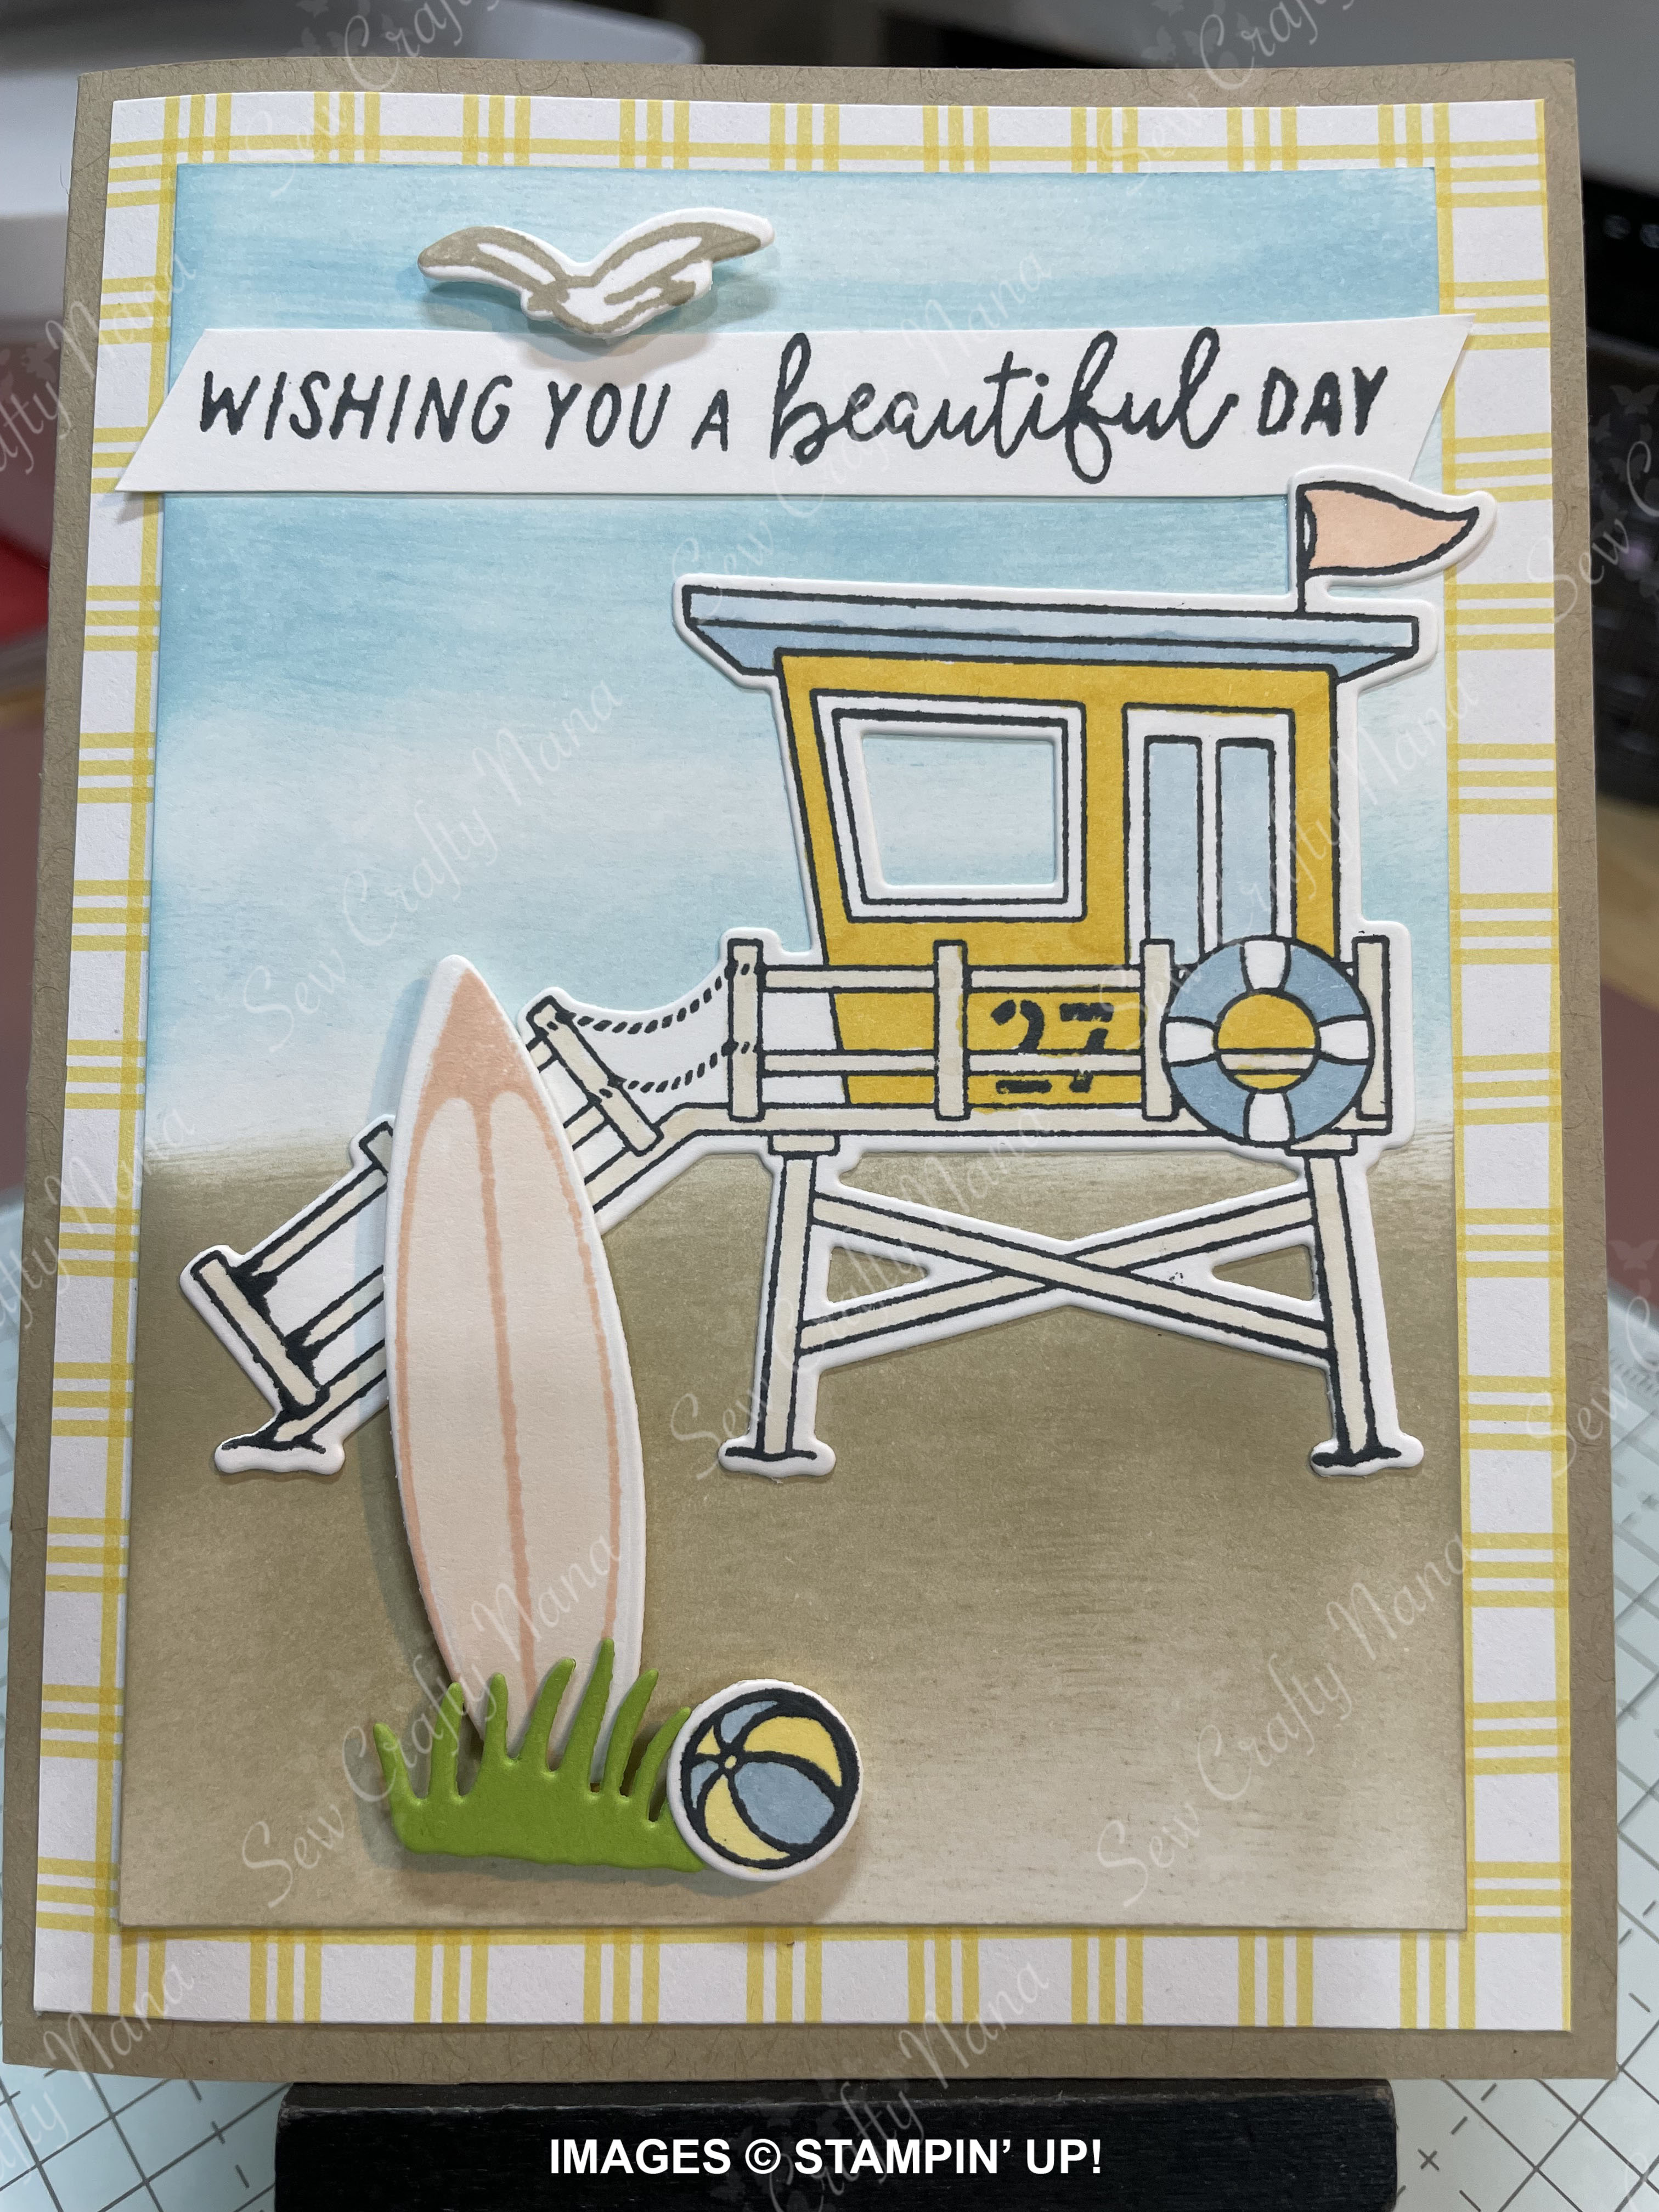
I made 4 of them – using the Beach Day Bundle, Everyday Details Bundle, Hooray for Surprises Bundle, and Sending Love Bundle. Below are the pictures from the catalog as well as my versions. I didn’t use the recipes; all products were guessed, or I substituted… just because.
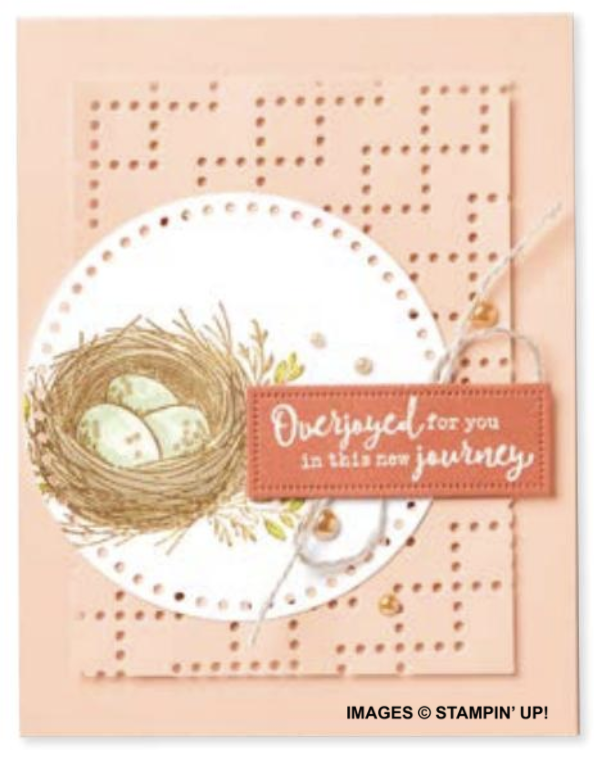


I really love this process because it gives me a starting point and then I can add my own spin if I like. It is also a great way to use a new stamp/die set or bundle – to get your juices flowing for other uses. Another thing you can do is just reimagine the layout – not the card. In other words, let’s look at the Everyday Details card. It is a standard card base. It has a die cut (or embossed) layer that looks like it has about ½” border, in the same color as the base. Next is a white die cut or “fancy” circle that takes up a good portion of the layer. That circle could be stamped with something or have die cuts applied to it. Then there’s a darker contrast color label – stamped or heat embossed with the sentiment. So, here’s the card layout (or sketch):
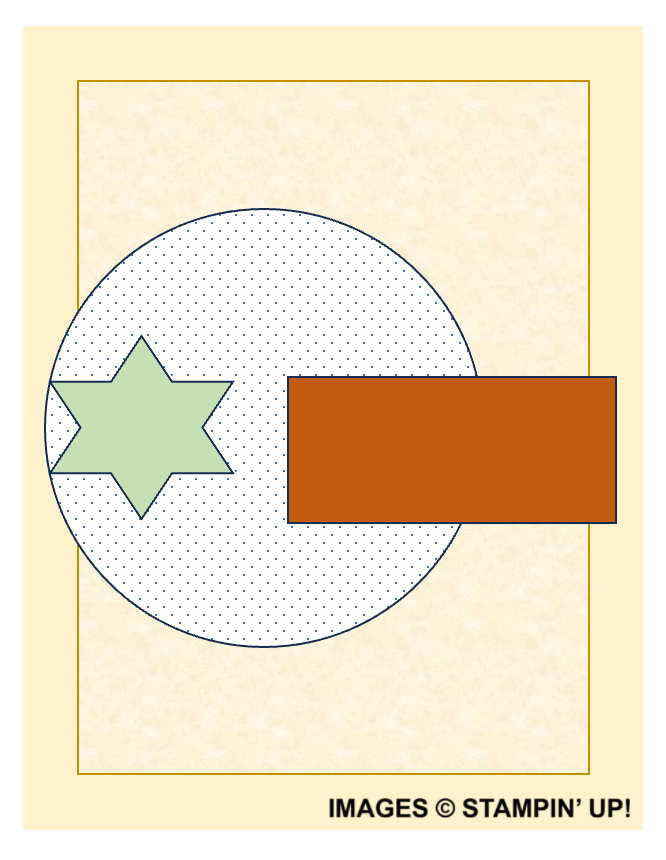
You can use this with any products you have to make a card! I love looking past the obvious to come up with something different. It’s a great challenge!
Happy Crafting!
Teresa
Don’t forget to hop over to my YouTube channel – SewCraftyNana – to see THIS VIDEO about these cards and a chat about CASE-ing cards!
Card Measurements:
Note: These are for my samples – they are not the Stampin’ Up! recipes for the catalog cards. Basic White 4” x 5 ¼” panel was added inside each card.
Beach Day Card:
- 8 ½” x 5 ½” Crumb Cake card base – scored at 4 ¼”
- 4” x 5 ¼” DSP Layer – yellow crosshatch pattern from Bee Mine
- 3 ½” x 4 ¾” Basic White layer
- Balmy Blue and Crumb cake ink blending to make sand and sky
- Basic White and scraps for die cuts and Granny Apple Green for grass
- Inks used for stamping images: Petal Pink, Pecan Pie, Memento Tuxedo black
- Stampin’ Blends to color images
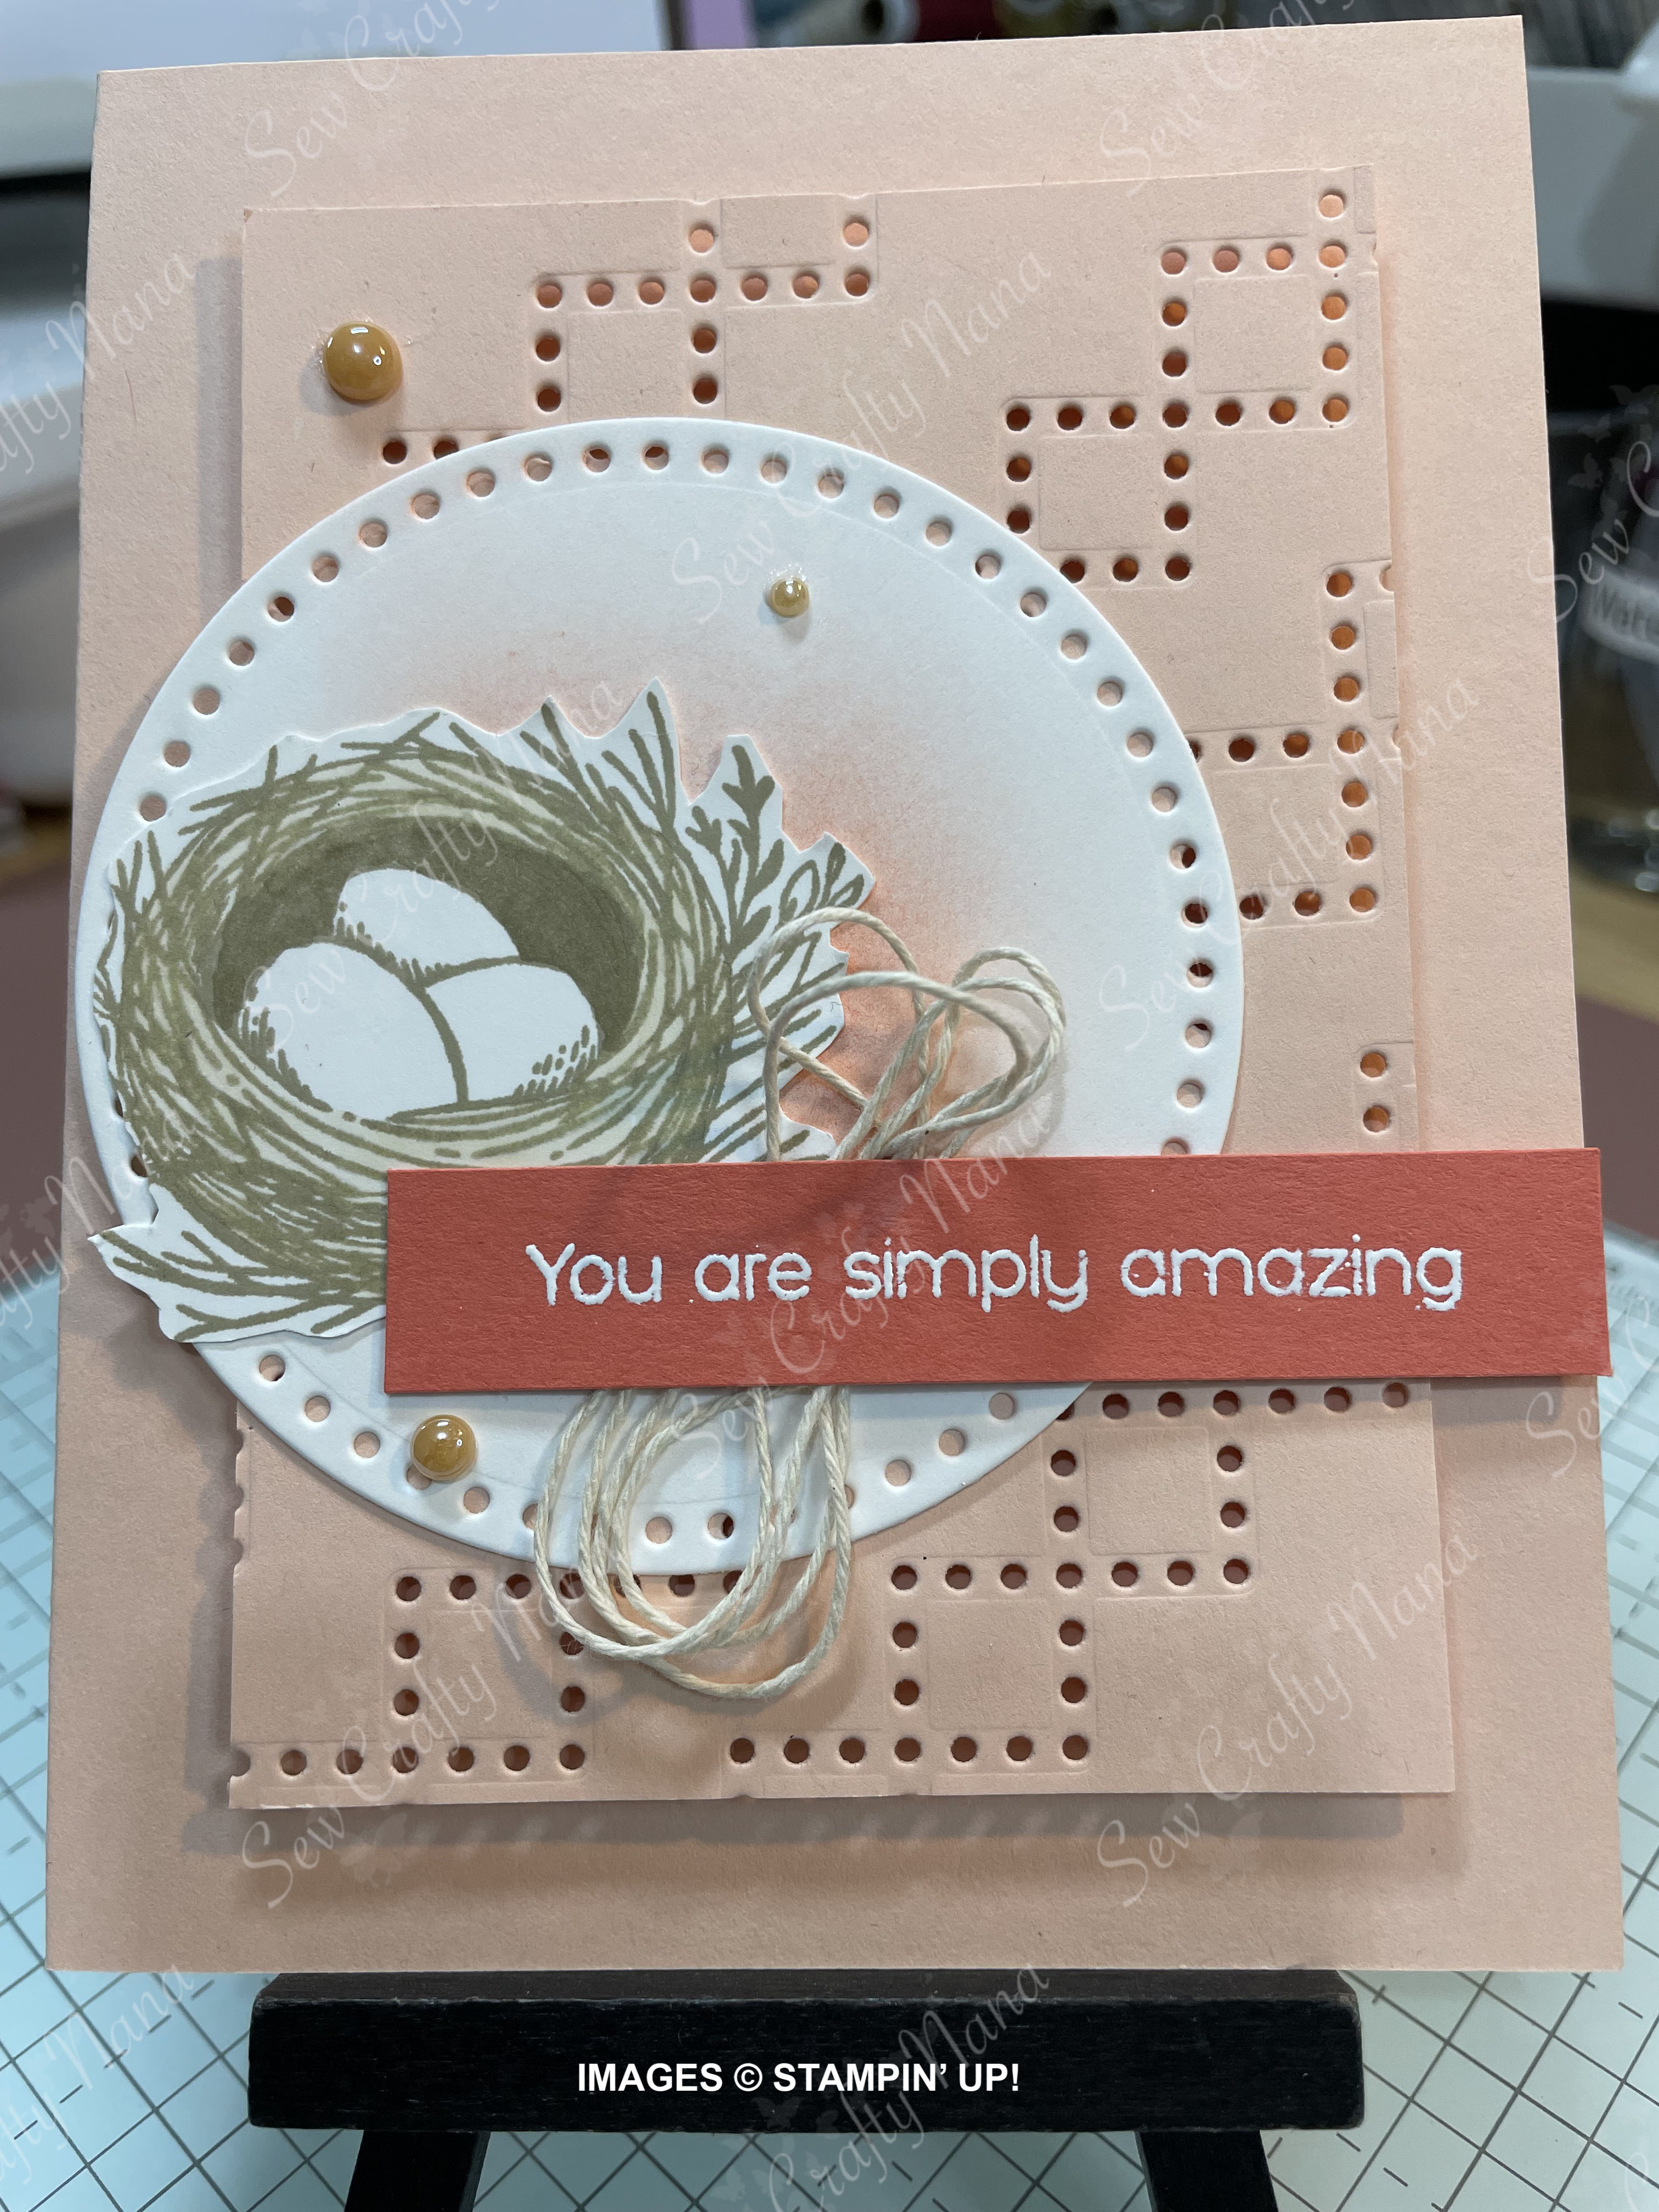
Everyday Details card:
- 8 ½” x 5 ½” Petal Pink card base – scored at 4 ¼”
- 3 ¼” x 4 ½” Petal Pink layer – die cut with diamond pattern
- Die cut Basic White circle
- Ink blended lightly in the center with Calypso Coral ink
- Calypso Coral die cut label – heat embossed with sentiment in white
- Linen Thread
- Scrap of white for stamped nest
- Stamped in crumb cake and shaded with crumb cake Stampin’ Blends
- Champagne Iridescent Dots
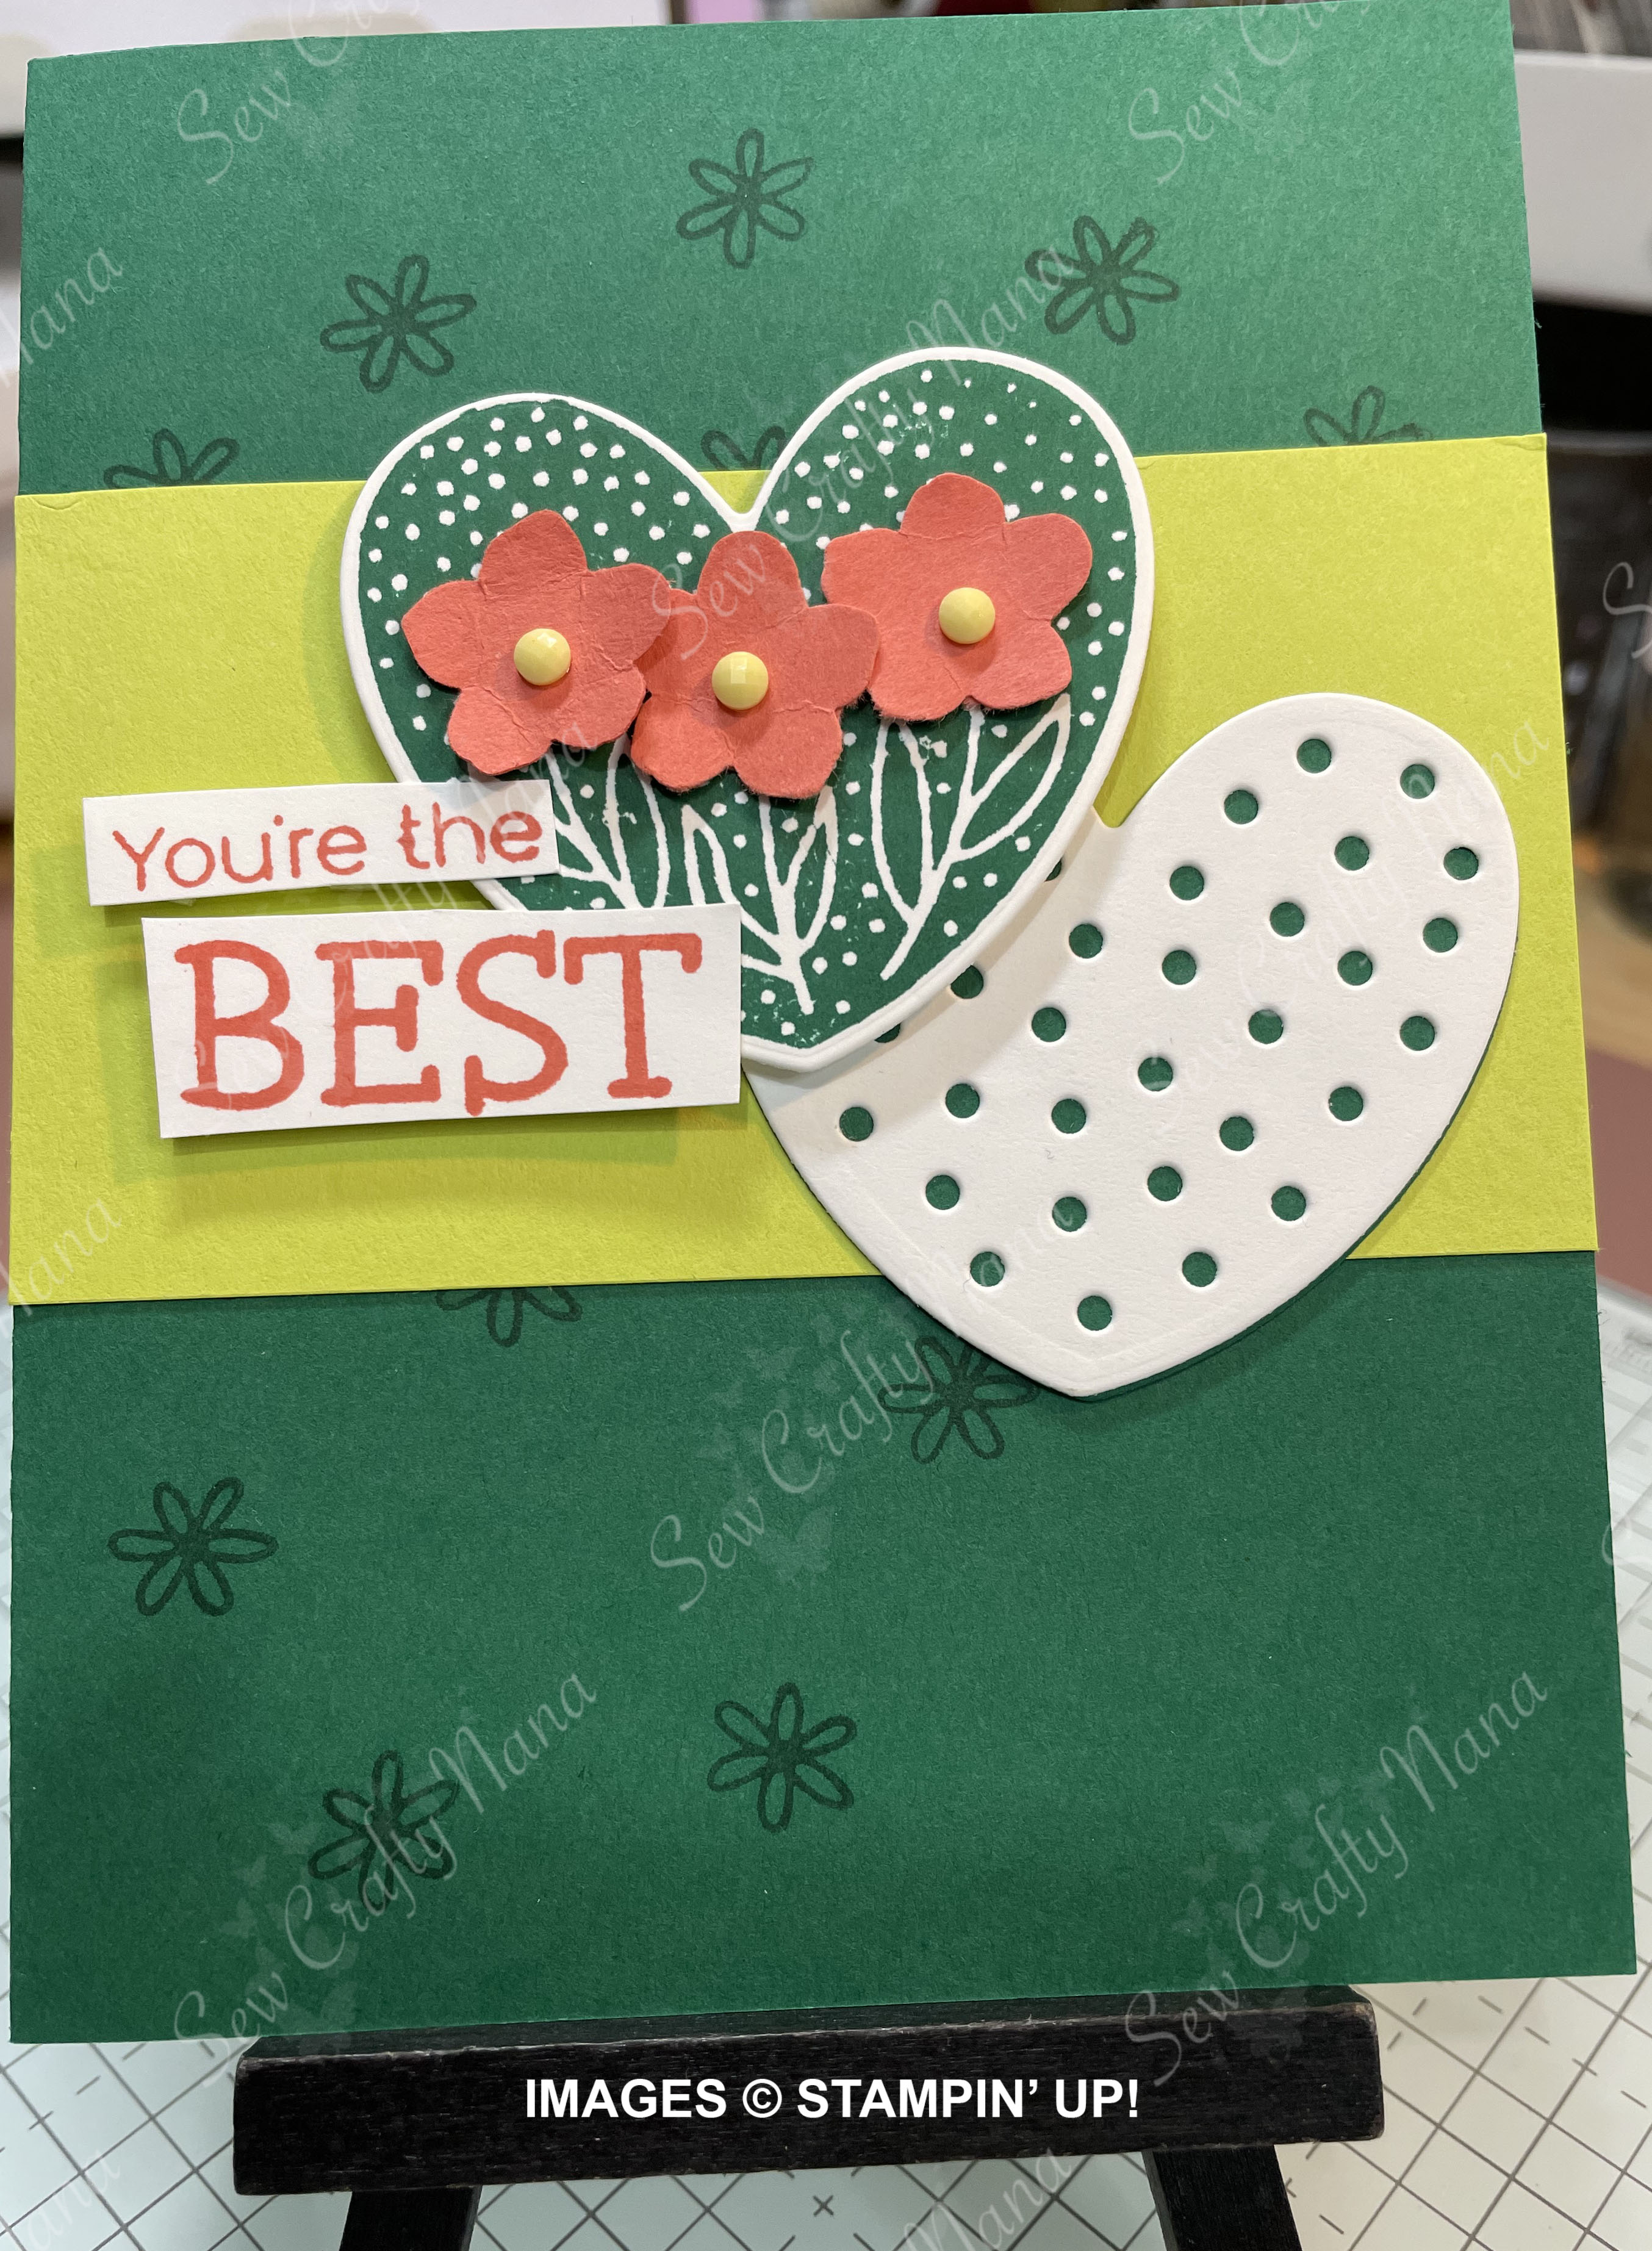
Hooray for Surprises card:
- 8 ½” x 5 ½” Shaded Spruce card base – scored at 4 ¼”
- Stamp card front with small flower stamp in Shaded Spruce ink
- 2 ¼” x 4 ¼” Lemon Lime Twist panel
- Stamp sentiment on Basic White in Calypso Coral ink – cut words apart
- Die cut hearts
- White heart with holes – shaded spruce panel behind
- Stamped white heart with flowers and dots (Shaded Spruce ink)
- Punch 3 flowers from Petal Park Punch (only smallest petal piece) from Calypso Coral cardstock scrap
- Adhesive Backed Solid Gems – Lemon Lolly (for flower centers)
Sending Love card:
- 8 ½” x 5 ½” Balmy Blue card base – scored at 4 ¼”
- Stamp card front with postage cancellation “waves” very lightly in Balmy Blue (stamped off)
- 3 ½” x 4 ¼” Basic White panel
- Scraps for Die cuts
- Basic White cardstock
- Crumb Cake cardstock
- Blueberry Bushel gingham DSP
- Blueberry Bushel cardstock
- Granny Apple Green cardstock
- Blueberry Bushel ink – stamp sentiment on white panel, then stamp cancellation over it very lightly in Gray Granite
- Adhesive Backed Hearts & Flowers embellishments
- White round brad for mailbox flag
Links to Supplies used:
- Beach Day Bundle
- Everyday Details Bundle
- Hooray for Surprises Bundle
- Sending Love Bundle
- Cardstock:
- Designer Series Paper (DSP)
- Classic Stampin’ Pads (ink)
- Tuxedo Black Memento ink
- White Embossing Powder (part of Basics set, not available at time of blog post)
- Heat Tool
- Stampin’ Blends
- Linen Thread
- Adhesive Backed Solid Gems (Lemon Lolly)
- Adhesive Backed Hearts & Flowers
- Round & Square Brads
- Champagne Iridescent Dots
- Petal Park Builder Punch
- Stampin’ Cut & Emboss Machine
- Paper Trimmer
- Adhesive of your choice
- Take Your Pick
- Bone Folder
- Paper Snips

Leave a comment