
V Pocket Card
Showcase your beautiful paper!
This is a super easy fun fold using 12” x 12” Designer Series Paper (DSP). You can get 2 cards from one sheet of DSP. They are fast and easy to make since the card is primarily the DSP. A simple insert made with cardstock gives you a place to put an inside sentiment or write a personal note. Minimal outside decoration is needed because of the beautiful paper base. Let’s get started!
Cutting Instructions:
Here is a diagram of the cutting and scoring for your DSP. Tip: Make sure you pay attention to the direction on your paper (if it’s directional).
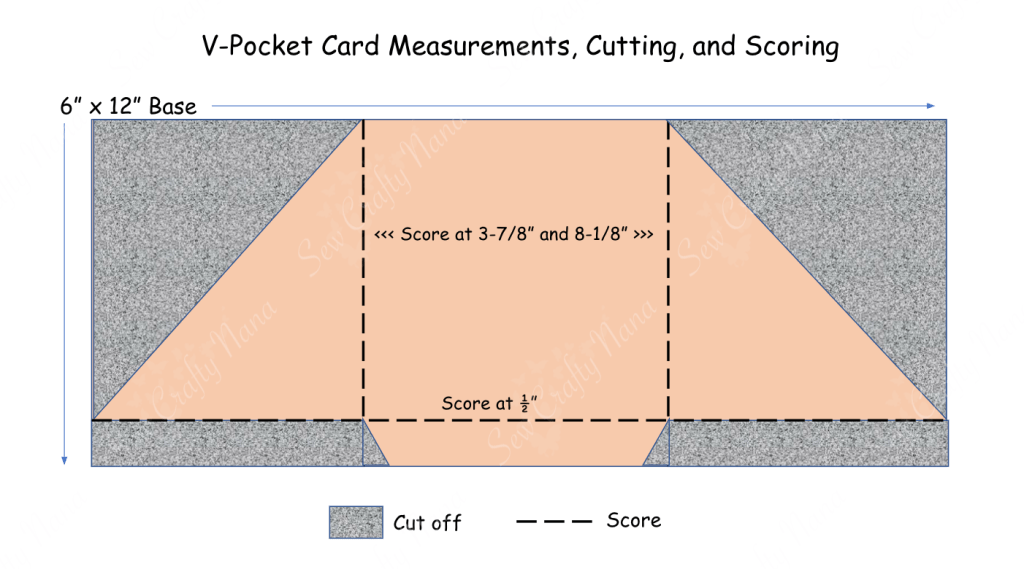
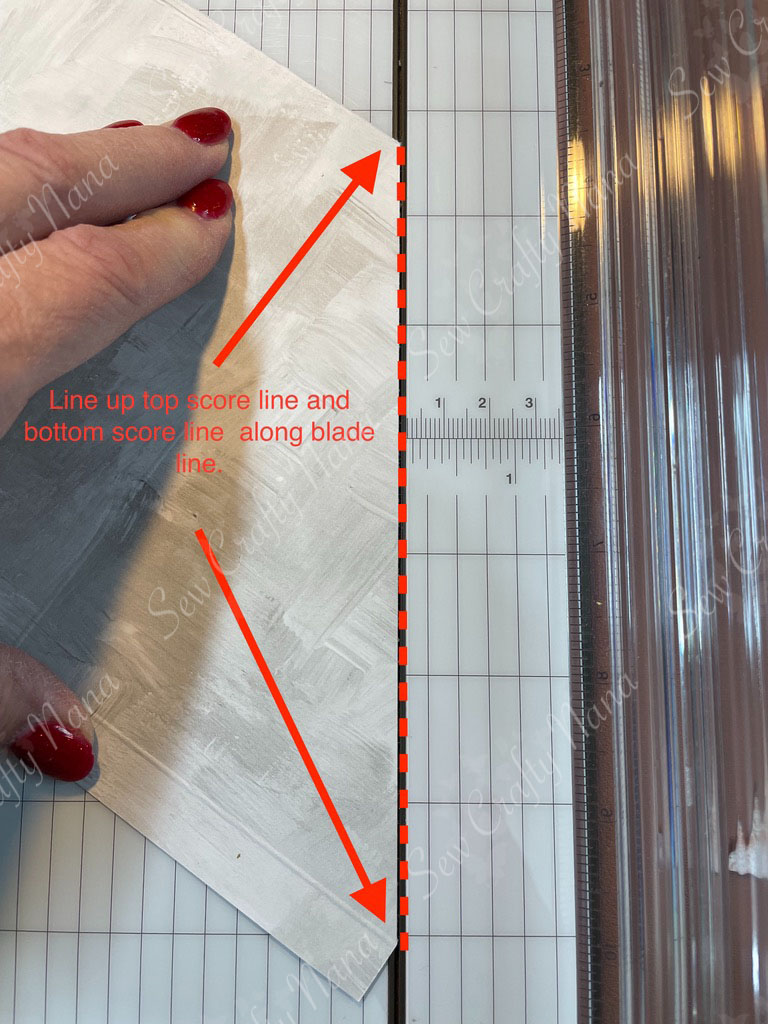
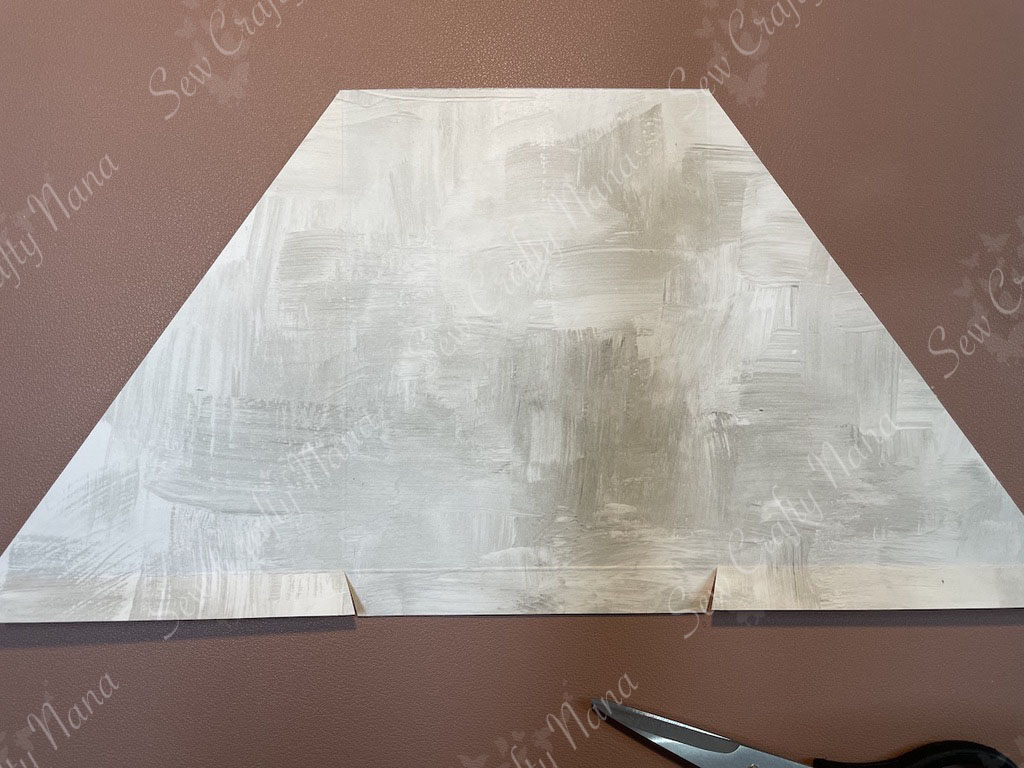
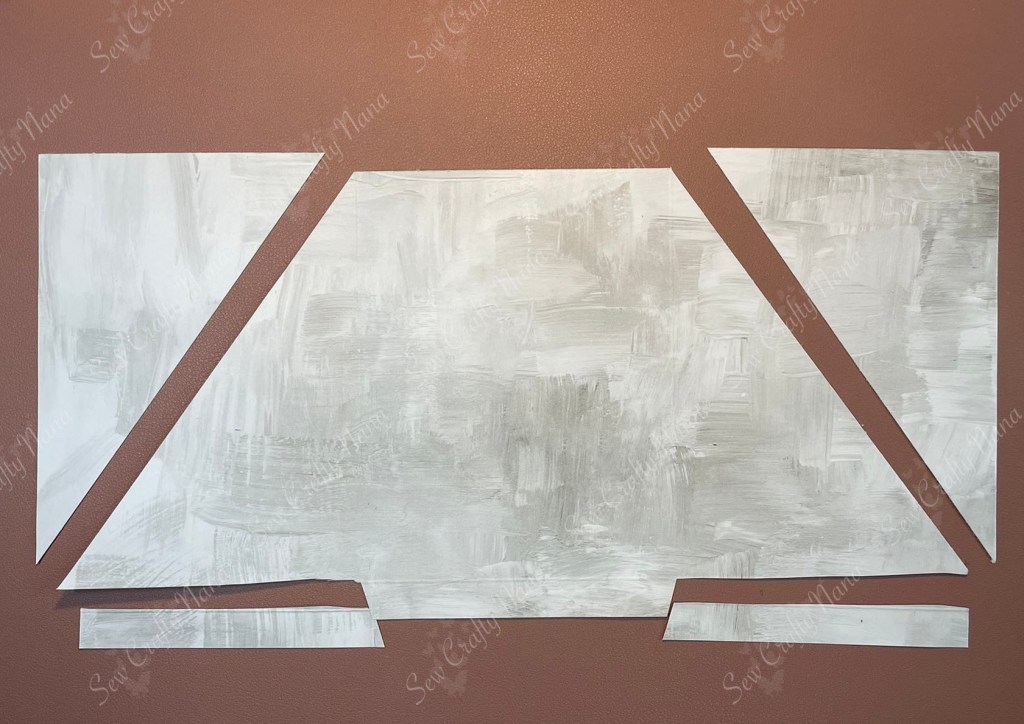
Cut your DSP to 6” x 12” – so you are using ½ sheet for one card. Score this as indicated on the picture – ½” along the bottom edge (pay attention to directionality of paper) and at 3-7/8” and 8-1/8”. Then you can cut off the two bottom rectangles from each end and miter (angle) the remaining rectangle tab. Cut off the triangles from each flap by cutting from the top score line to the bottom corner.
Tip: These triangles make great card fronts, so save them and use them on a card! The dimensions are 3-7/8” x 5 ½”.
Cut your cardstock:
- Option 1: Layer cardstock 4” x 5 ¼” and Basic White/Very Vanilla 3 ¾” x 5”
- Option 2: Basic White/Very Vanilla 4” x 5 ¼” (the Christmas Tree sample is done this way)
You’ll need something to make a hole or slit for your ribbon and then a scrap for your sentiment for the front (or die cuts) – that’s it!
Please subscribe to my YouTube channel – SewCraftyNana – and watch the video tutorial here: https://youtu.be/ZsF1P37xpKE
Assembly Instructions:
- Prepare your DSP as shown in the guide above.
- Fold and burnish on the score lines.
- Fold the bottom ½” tab to the inside of the card and put adhesive on it. You can use Tear and Tape or any adhesive of your choice.
- Fold in one side, adhering to the ½” tab at the bottom. Place adhesive on the other side triangle along the bottom and fold it over the first side (it doesn’t matter which you fold first – you decide). You’ve created your V-Pocket!
- Prepare your insert by stamping a sentiment (optional) and attaching it to the mat, if you are using one.
- Punch a hole or make a slit at the top of the insert and attach ribbon or twine – this is what tells the recipient to pull the insert out. You can also decorate the insert if desired.
- Stamp and die cut or punch your front sentiment or decoration. Attach it to the front. I use dimensionals, but you can attach it flat as well.
- Slide in your insert and you are finished!
Tip: Keep in mind when applying your outside sentiment that you can only apply adhesive where the sentiment touches the DSP – make sure you don’t accidentally close the pocket or attach to the insert card. I do this by applying the adhesive/dimensionals to the DSP, not the label or decor.
This is a quick and beautiful card to make. Anyone would love to receive this beauty for any occasion!
Let me know what you think of this card layout. I’d love to hear if you are going to try this or if you’ve made this one before.
Thanks for stopping by – Happy Crafting!
Teresa
Supplies Used:
(I’ve linked anything that was available at the time of the blog post)
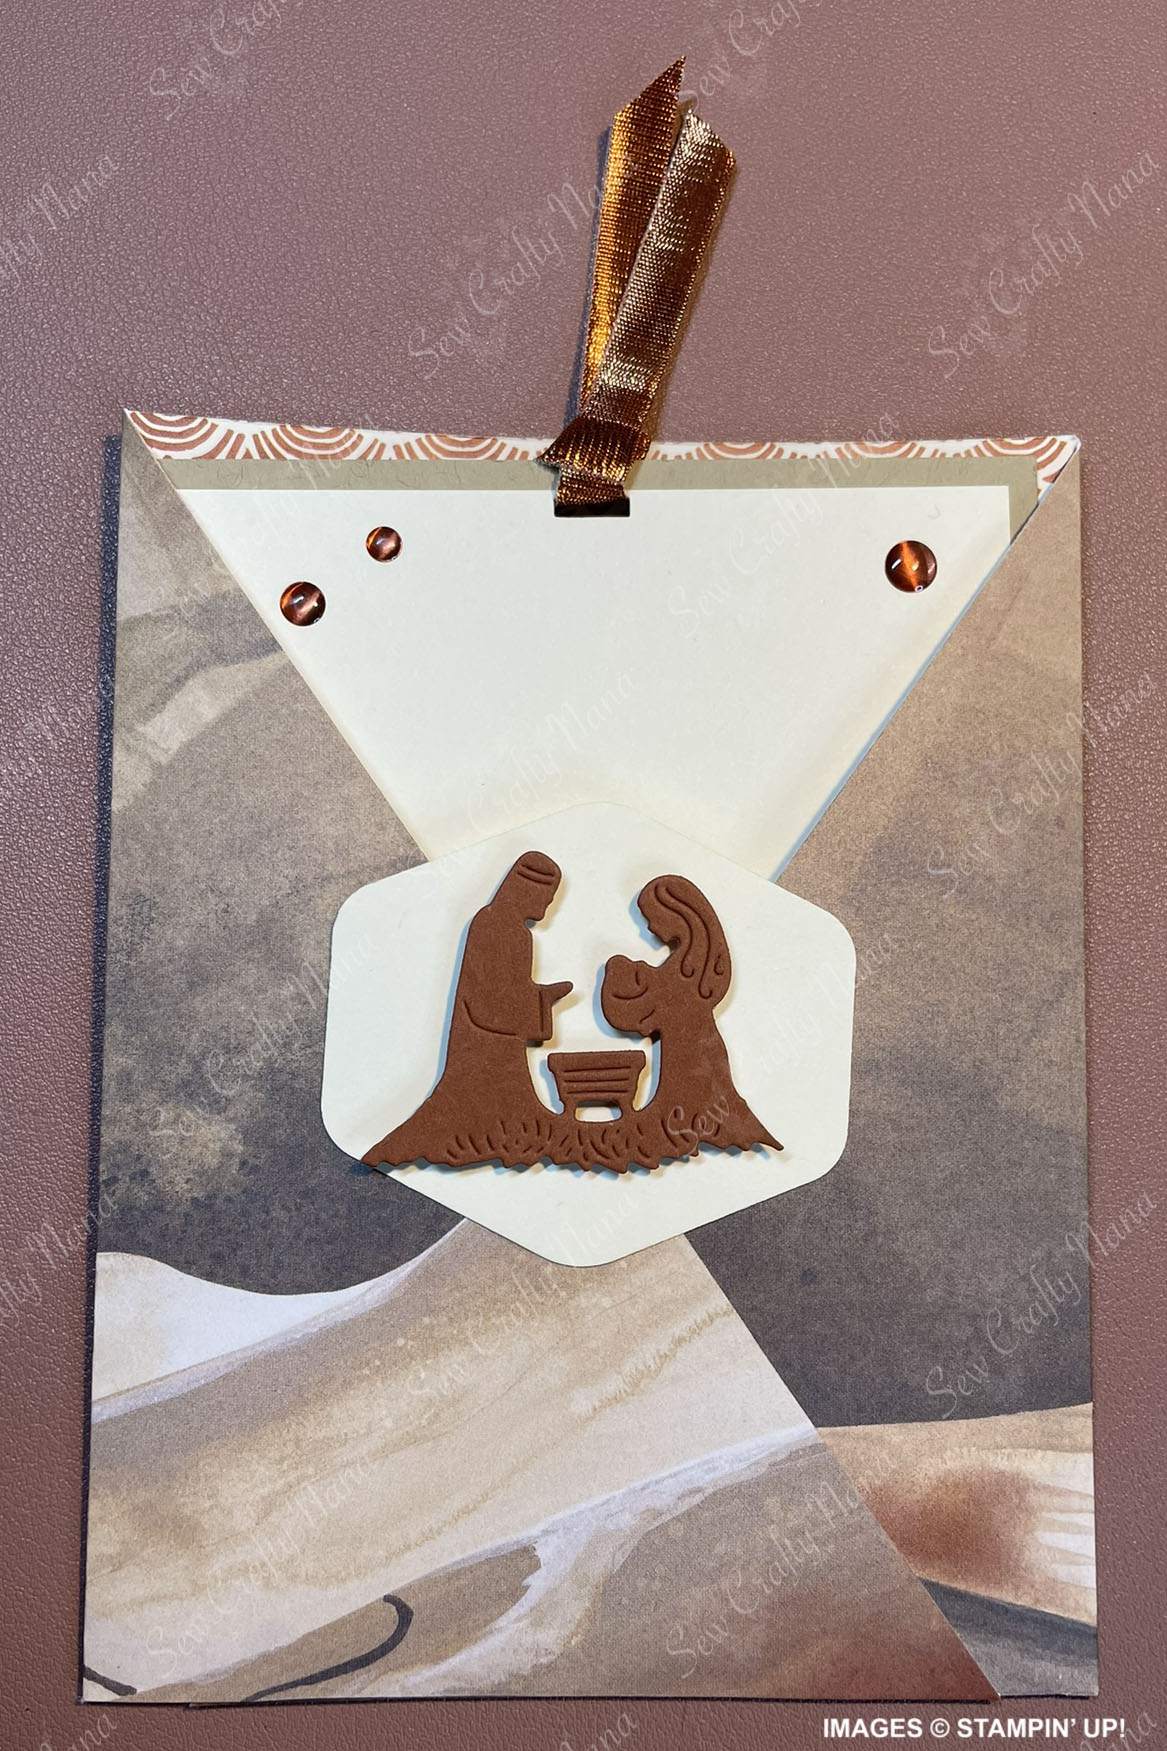
Sample 1 –
- O Holy Night DSP
- Very Vanilla cardstock
- Crumb Cake cardstock
- Copper Clay cardstock
- Night Divine Dies
- Copper Ribbon for pull tabs
- 2023-2025 In Color Dots
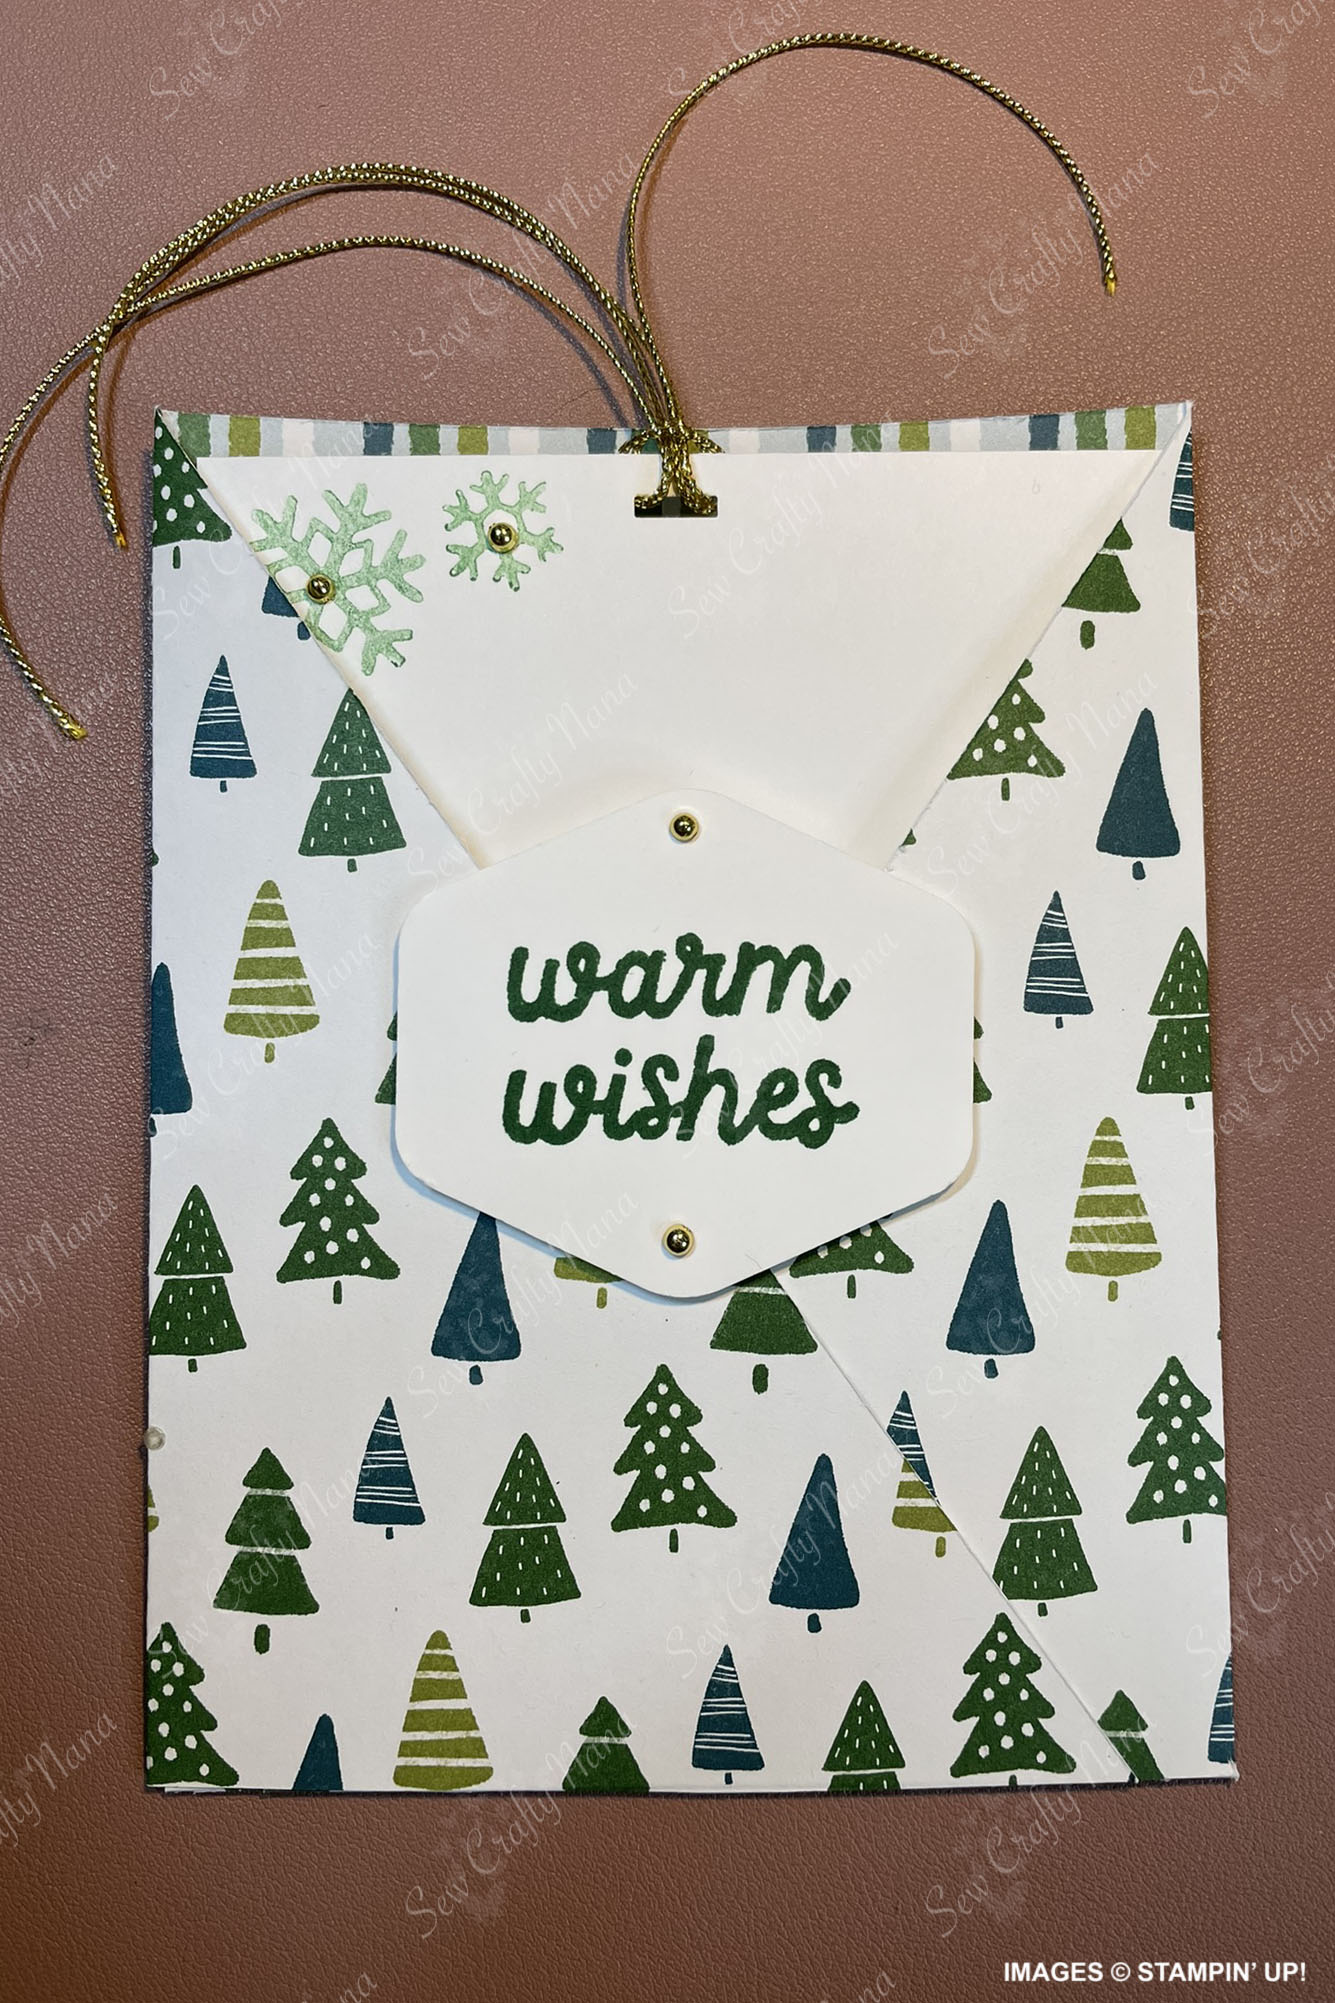
Sample 2 –
- Shining Christmas DSP
- Basic White cardstock
- Cherry Cobbler cardstock
- Beary Cute Stamp set
- Shop the Town Stamp set
- Cherry Cobbler Classic Stampin’ Pad
- Real Red & Gold ⅜” Dotted ribbon
- Gold Festive Pearls
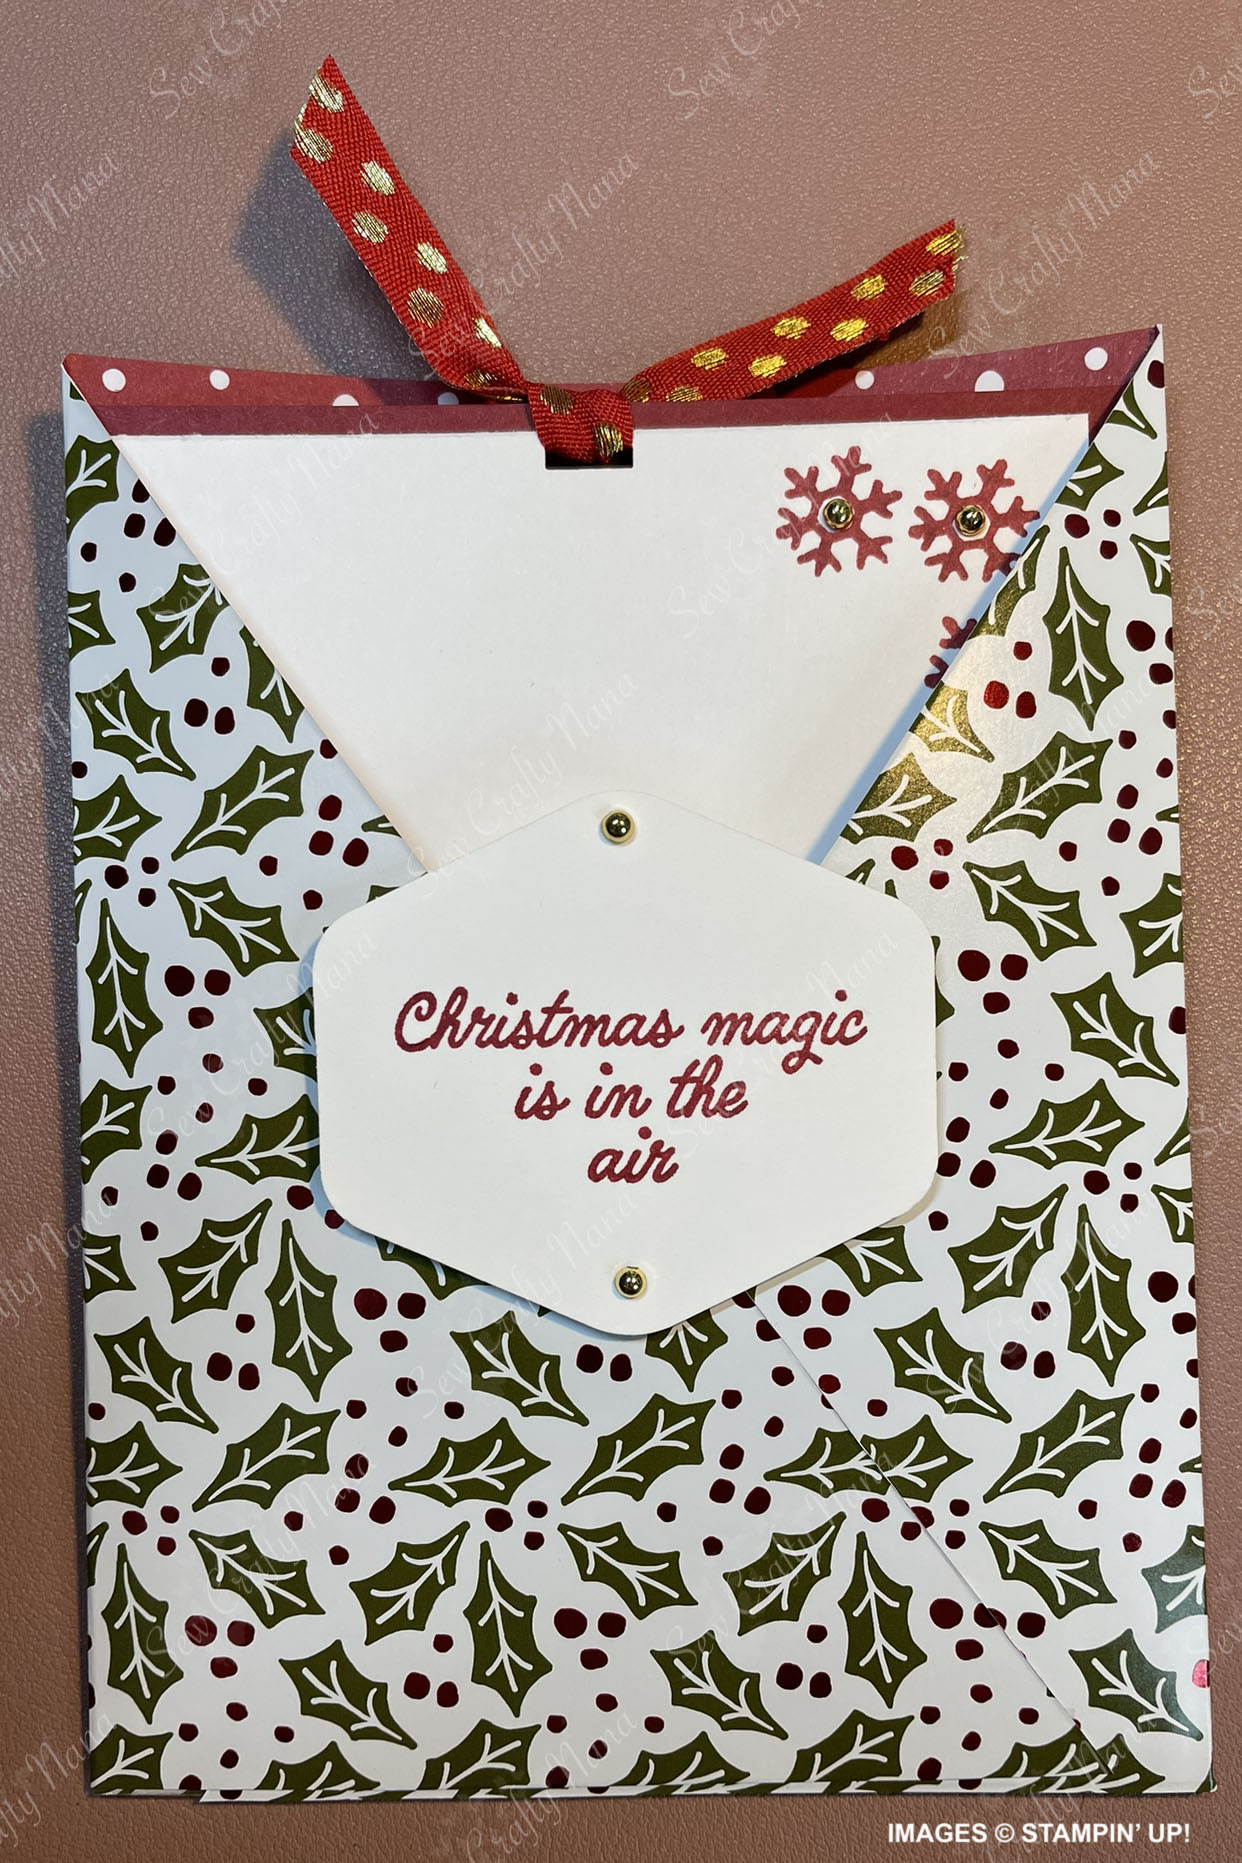
Sample 3 –
- A Walk in the Forest DSP (Retiring 01/04/2024)
- Basic White cardstock
- Simply Elegant Trim (Gold)
- Beary Cute Stamp set
- Gold Festive Pearls
- Garden Green Classic Stampin’ Pad
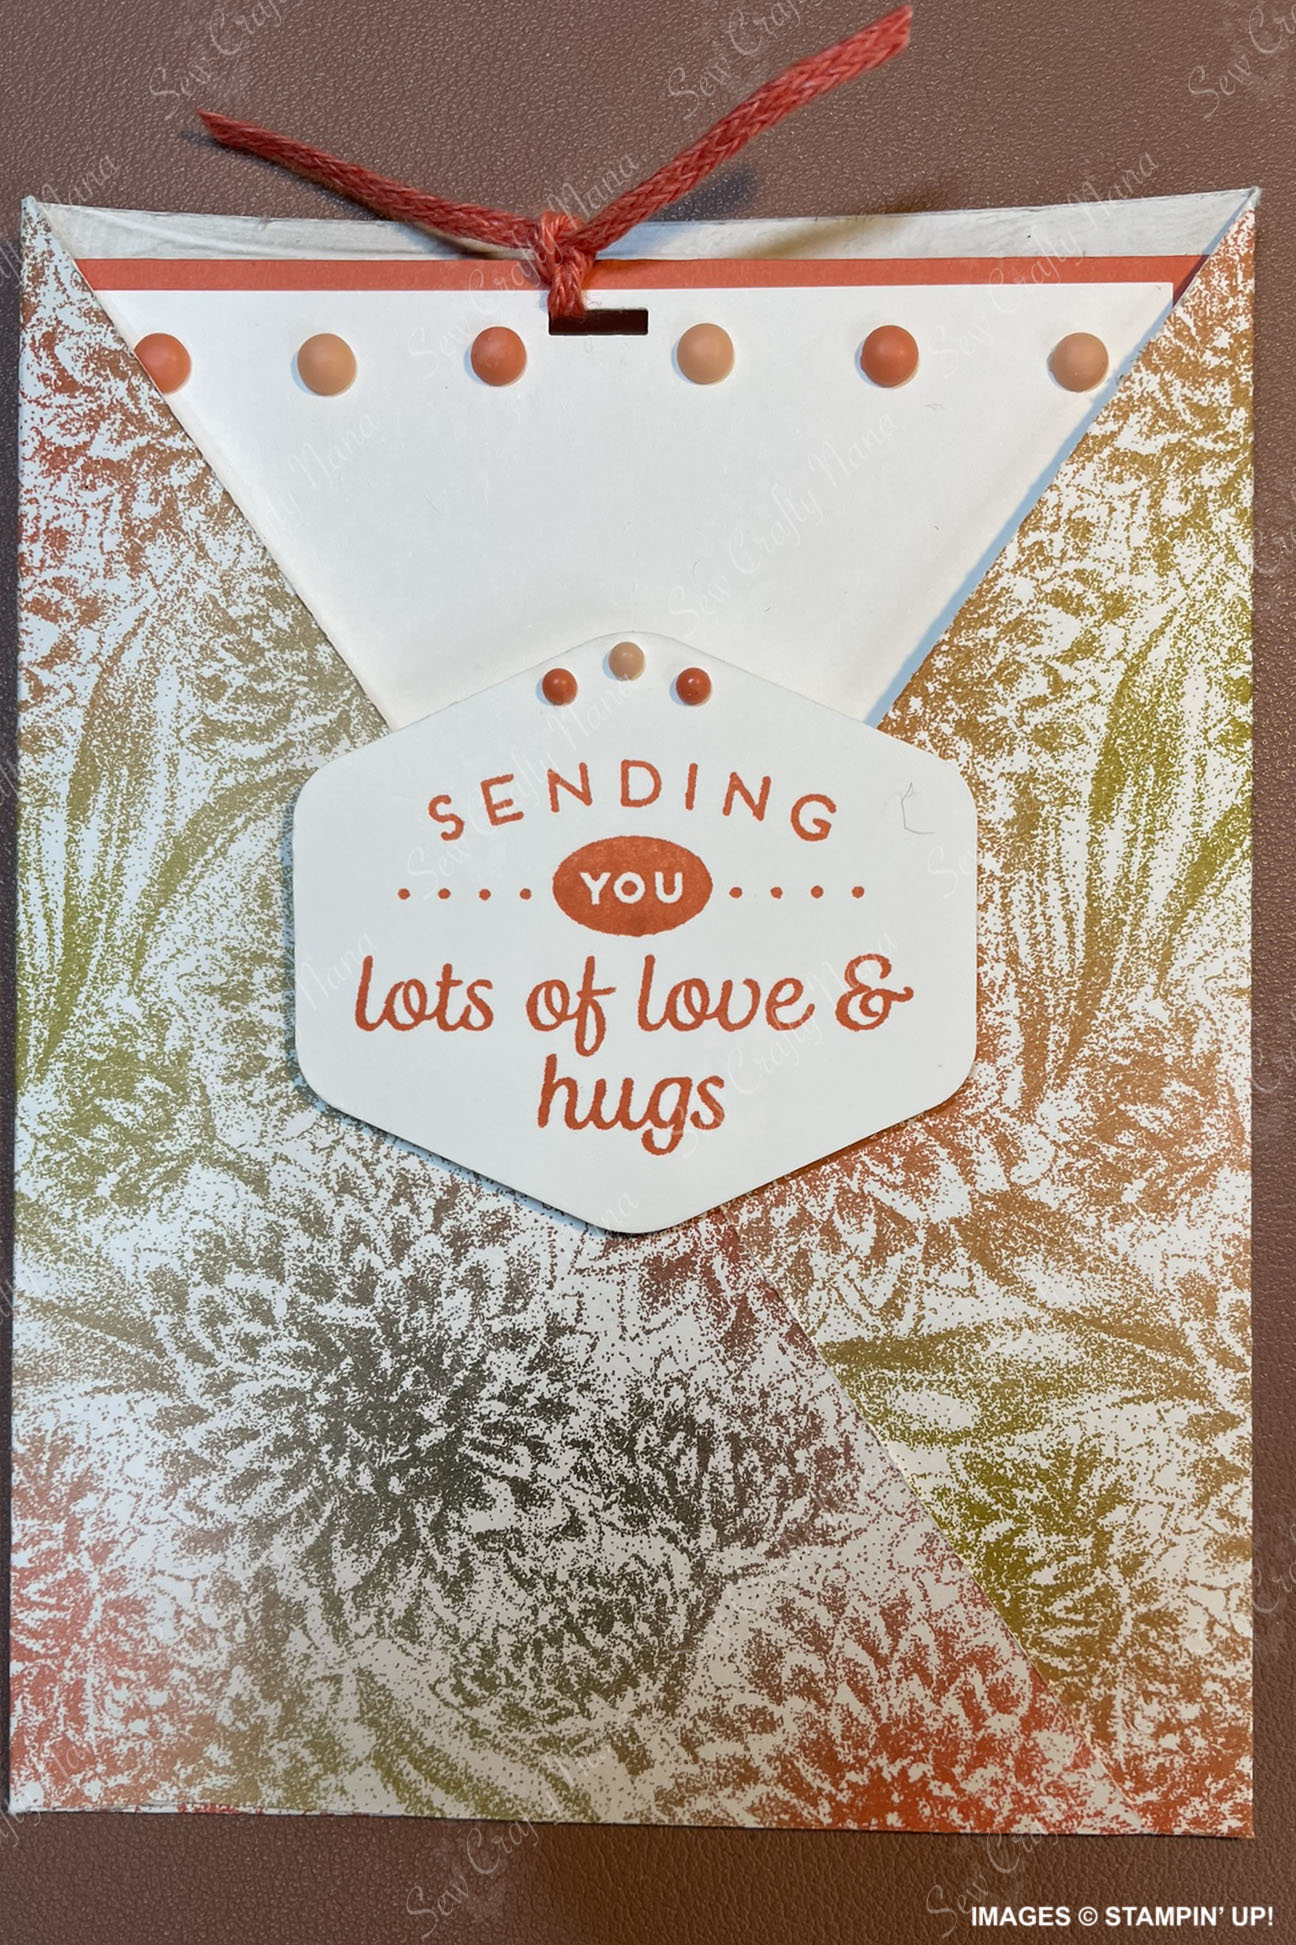
Sample 4 –
- Softly Stippled DSP (Available Jan. 4 – Feb. 29, 2024 as Free Sale-a-bration selection with $50 purchase)
- Basic White cardstock
- Calypso Coral cardstock
- Heartfelt Hexagon Stamp set
- Calypso Coral Braided Linen Trim
- Ombre Matte Decorative Dots
- Calypso Coral Classic Stampin’ Pad
All Samples –
- Very Best Trio Punch (slit)
- Heartfelt Hexagon Punch
- Stampin’ Seal +
- Stampin’ Dimensionals
- Paper Snips Scissors
- Paper Trimmer
- Clear Block D
- Stampin’ Scrub
- Stampin’ Mist Stamp Cleaner
- Take Your Pick (™) tool
- Bone Folder

Leave a comment