Book Binding Fold – Easy & Quick Christmas Cards
This is one of my favorite card folds. It is so easy, yet really looks beautiful. You can showcase Designer Series Paper (DSP), like I did, or you can decorate the front with coloring or die cuts. There are so many options. Ribbon or no ribbon. Sentiment or no sentiment. Let me take you through the 4 cards showcased here.
All of these cards use Basic White cardstock as the inside panel. They all used sentiments (inside & outside) from the Brightest Glow stamp set. They are all embellished with the Adhesive-Backed Glitter Sequins – my current favorite embellishment!
Here are the measurements for the two types of Book Binding cards I made.
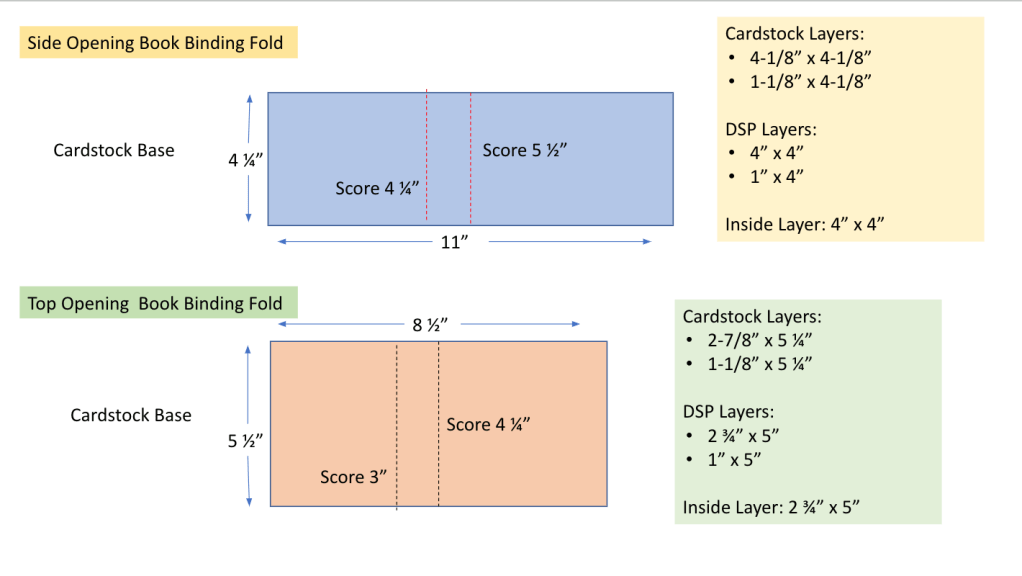
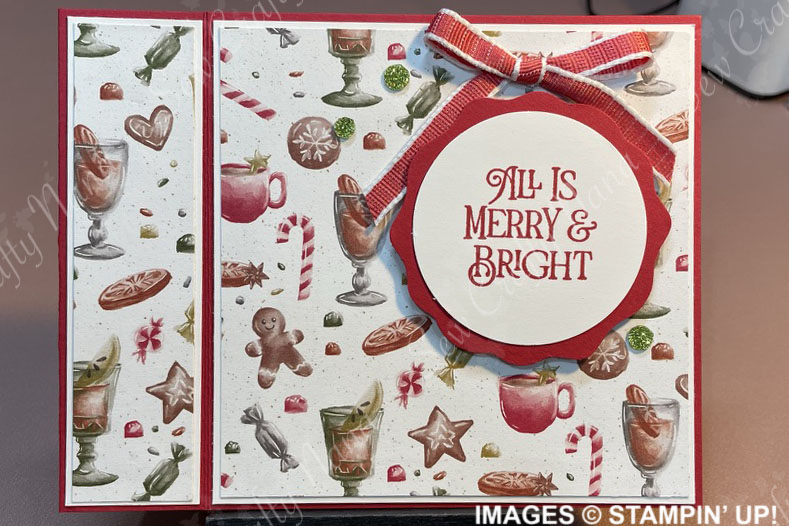
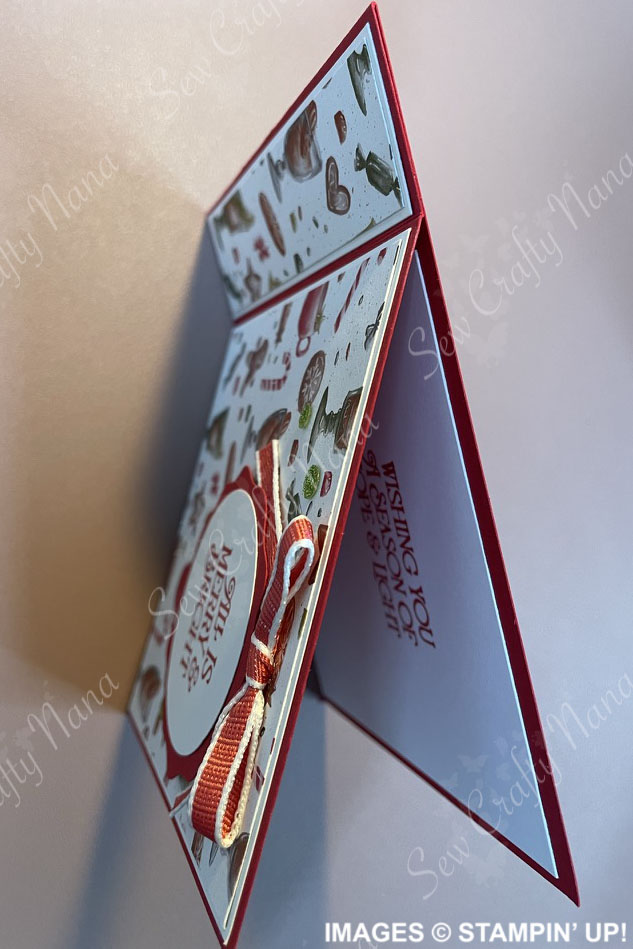
My first card is a side-fold Book Binding fold. For this one, I used Real Red for the card base, Basic White for the layer, and Traditions of St. Nick 12 x 12” DSP (an Online Exclusive). I used the Decorative Circle punch and Real Red for the sentiment layer and the 2” Circle Punch (Online exclusive) for the sentiment on Basic White. I topped this off with a bow. The ribbon I used is not yet available to customers – it’s a new product coming out in January 2024! It’s Sweet Sorbet and white, but I think it goes well with the candy canes on the DSP. The last thing was the sequins, I used the green ones on this card.
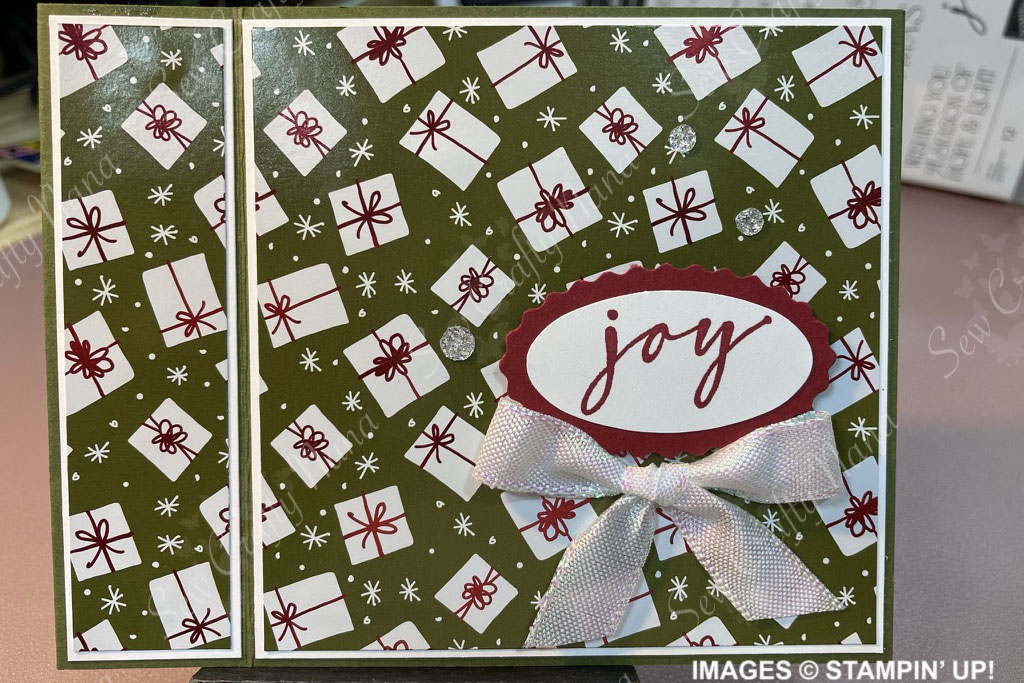
The next card is the same side-fold technique. This one has a Mossy Meadow card base, Basic White layers, and Shining Christmas 12 x 12” Specialty DSP. This DSP has metallic Cherry Cobbler in it and is so beautiful. It’s another Online Exclusive, so you won’t find it in any catalog! For this one I used a Cherry Cobbler scrap to cut the scalloped oval from the Double Oval Punch and then Basic White for the standard oval on the same punch. I used the White Iridescent Ribbon to make a bow to finish this off. I really didn’t want to cover up that beautiful paper! I used 3 of the white glitter sequins on this one.
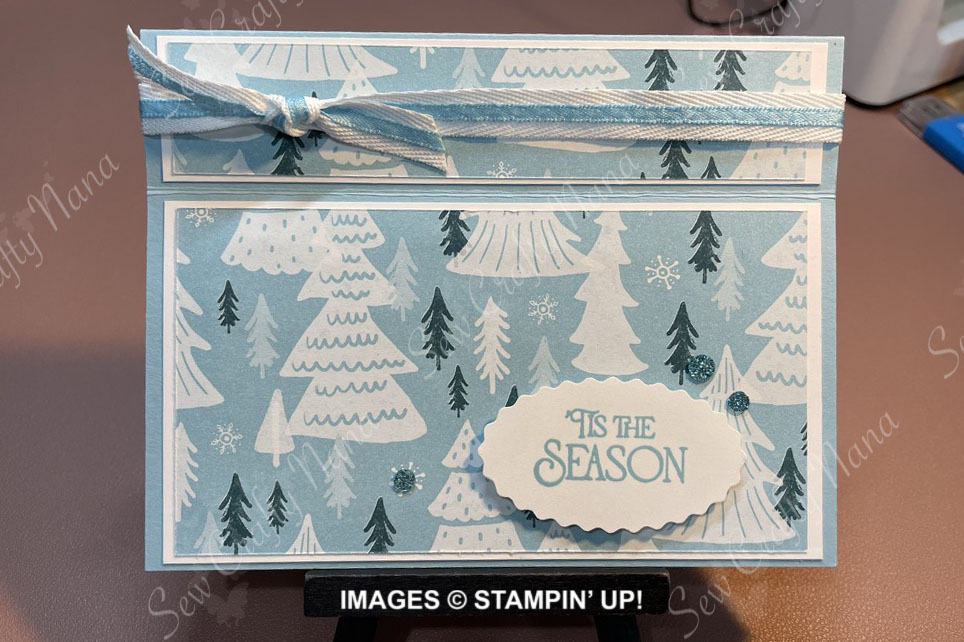
This one is my favorite! I’m not sure if it’s the blue or the trees or that ribbon – which I love – but it just eeks out the favorite spot for me. This is a top-fold Book Binding fold. It uses Balmy Blue for the card base, Basic White for the layers, and A Walk in the Forest 12 x 12” DSP. The trees just seem so peaceful on this paper. I used the Double Oval Punch again, but no layer – just Basic White. Again… it was hard to cover any of that paper! The ribbon is Balmy Blue & White 3/8” Double-Stitched ribbon. It’s soft and just lovely. I used the blue glitter sequins on this one and they just sparkle it up!
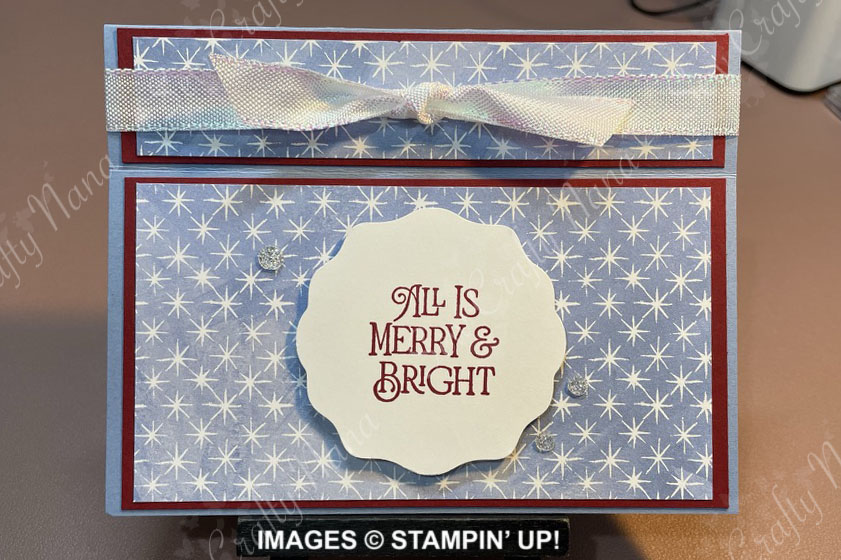
The last card was the first one I created. I love Boho Blue and I love Cherry Cobbler. This combination is going to be my new Christmas colors! For this one, I used Boho Blue for the card base, Cherry Cobbler for the layers, and O Holy Night 12 x 12” DSP. I used the same Decorative Circle punch for the sentiment on Basic White and the Iridescent Ribbon. I finished off with the white glitter sequins. Very elegant with the deeper tones and a little bit of sparkle.
Assembling Book Binding Fold Cards
Be sure to check out my You Tube Channel – SewCraftyNana – and watch the video tutorial: https://youtu.be/M3Rc4_7GUxI
Assembling the two versions of the cards is the same, but I do have some tips. Here’s how I assembled them.
The first thing you do is attach the layers and DSP to the front of the card. Make sure you don’t cover the score line for the card to open.
TIP: If you are applying ribbon to the small part of the “book” (like my 3rd and 4th versions above) you want to do that before you glue that part down. You can wrap the ribbon around the inside of the card or just have it fold over to the inside ½” or so and adhere it there. Once you have that done, you can glue that side piece down to the card.
If you are not putting ribbon there, you can just go ahead and glue that part down before or after you attach the front layers.
Stamp your sentiment for the outside on Basic White scraps. Punch or cut them out however you like. If you are layering, cut the coordinating layer as well. Stamp the inside sentiment on the inside layer piece. Attach the inside layer in your card. Attach the sentiment to the outside.
TIP: When I use a layer with the sentiment, I attach the sentiment to the layer and then pop the layered piece up on dimensionals. You could also glue the layer directly to the card front and then pop up just the white sentiment piece.
Embellish as you like and send your card to someone special!
Let me know what you think of the cards and this technique. They are fast to make and they can all look so different just by using a variety of DSP and positioning the sentiment different ways. They’re also great for using up those smaller leftover pieces of DSP. Have fun with it!
All the best –
Teresa
Supplies Used:
- Real Red Cardstock
- Basic White Cardstock
- Mossy Meadow Cardstock
- Balmy Blue Cardstock
- Boho Blue Cardstock
- Cherry Cobbler Cardstock
- Traditions of St. Nick DSP
- Shining Christmas Specialty DSP
- A Walk in the Forest DSP
- O Holy Night DSP
- Brightest Glow Stamp Set
- Decorative Circle Punch
- 2” Circle Punch
- Double Oval Punch
- White ½” Iridescent Ribbon
- Balmy Blue & White 3/8” Double-Stitched Ribbon
- Adhesive-Backed Glitter Sequins
- Cherry Cobbler Classic Stampin’ Pad (ink)
- Balmy Blue Classic Stampin’ Pad (ink)
- Real Red Classic Stampin’ Pad (ink)
- Paper Trimmer
- Tombow Multipurpose Glue
- Stampin’ Seal +
- Mini Glue Dots
- Stampin’ Dimensionals
- Take Your Pick tool
- Paper Snips
- Clear Block B
- Clear Block C
- Clear Block D
- Clear Block H
- Stampin’ Mist Stamp Cleaner
- Stampin’ Scrub

Leave a comment