
Gift Tags for Any Occasion!
I’m on a mission to use only handmade gift tags… forever! As a paper crafter, that’s a reasonable thing to do. I have plenty of cardstock scraps to go with any color theme imaginable! I have Designer Series Paper scraps as well, for layering or decorating tags. And of course I have tons of sentiment stamps to use.
So, with that in mind, I am now working on Christmas gift tags. I want VARIETY, not assembly line, so I had to get my creative juices flowing. I pulled out all the parts and pieces I had – leftover die cuts from kits, all the ribbons and twines, and beautiful DSP. And then the stamp sets.
But wait.
What do you do if you aren’t a Stampin’ Up! hobby demonstrator like me – and you don’t get product pre-orders and discounts on everything you purchase?
Maybe you don’t have many stamp sets or die sets to choose from. In this blog post I’m going to talk about that. Creating with less. Choosing some key things and making beautiful handmade tags – without breaking the bank. At the end of this post, I have listed many options that I won’t cover in the post, but they might give you ideas of how to use what you have in your craft room. The most important thing is to enjoy the process!
Don’t forget to check out my YouTube channel – SewCraftyNana – and watch the video tutorial here: https://youtu.be/EJoPEdlviJg
An Elegant Tag
To me, elegance can be accomplished in a lot of ways. One way is to layer tone on tone, using slight variations with ink blending or stamping, or an embossing folder. Very simple. Add a sentiment and something metallic and you are DONE!
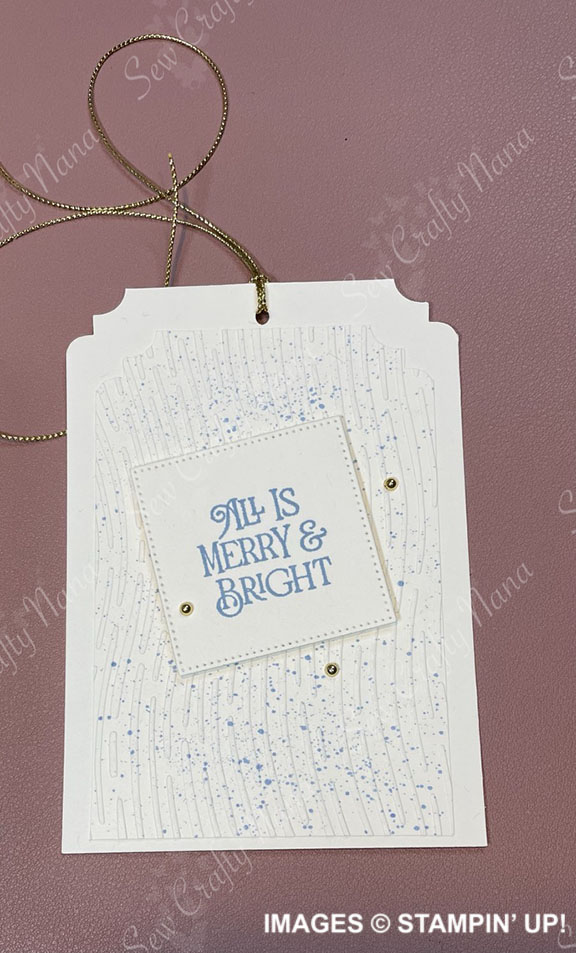
For this sample, I used Very Vanilla Cardstock. I cut two rectangles – Base 3 ½” x 5” and Layer 3” x 4 ½”. To make them fancier, I used the Very Best Trio punch on the two corners on one end. I then just splattered the layer piece with Boho Blue ink. I used a Stampin’ Blends marker to splatter, but this technique can be done many ways. You could even use a stamp that has a dotted pattern on it or leave this step out completely. All I wanted was a tiny bit of color – not a lot. Then I sent it through the Stampin’ Cut & Emboss machine using the Wavy Lines embossing folder from the Cheery Patterns set (there are 2 folders in the set). I then stamped my sentiment from the Brightest Glow stamp set in Boho Blue ink. This stamp set is a great sentiment set for Christmas and New Year. I cut out the sentiment with the 2” square from the Stylish Shapes dies – but you could totally just cut this sentiment with a paper trimmer, punch, or scissors. I layered the three pieces together, putting the sentiment on dimensionals at an angle.
I added the hanger using gold Simply Elegant Trim (comes in a pack of silver and gold) and gold Festive Pearls to complete the tag. You can stamp a to/from on the back or write a message – your preference. This is a generous size tag, but you can change the dimensions to size down if you like.
A Whimsical Tag
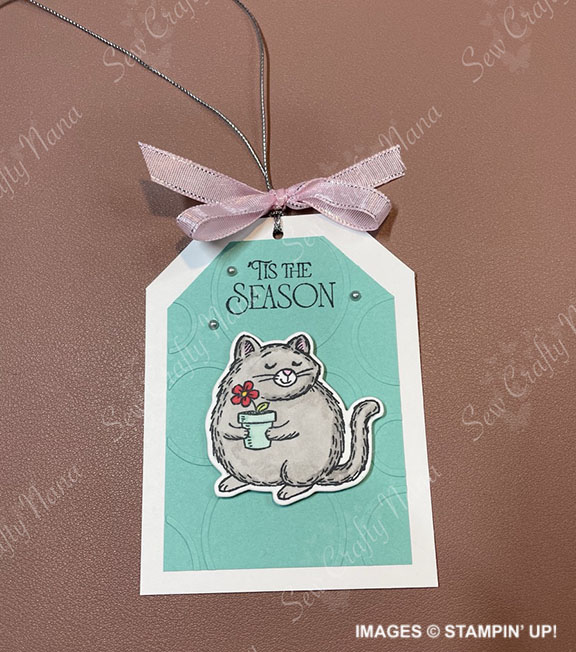
For this one, I wanted to use a cute character – you can pick ANY from your stamp sets. I picked from a new set called Fluffiest Friends for this one. I stamped the cat image in Memento Tuxedo Black ink and then colored with Stampin’ Blends – but remember this is more about technique. You can color them with whatever you have handy – colored pencils, markers, whatever. If you don’t love coloring, pick an image and leave it black & white!
Stampin’ Blends I used to color the cat: Gray Granite, Pool Party, Bubble Bath, Poppy Parade, Granny Apple Green, Daffodil Delight.
Again, I cut rectangles for my tag – Basic White 3” x 4” for the base and Coastal Cabana 2 ½” x 3 ½” for the layer. I used the same Very Best Trio punch and cut two corners with the straight diagonal part of the punch. I stamped a sentiment from the Brightest Glow stamp set and embossed it with the other folder from the Cheery Patterns set (bubbles).
Tip: I put my label in the folder so that the sentiment was “circled” and would not be interrupted by embossing.
I layered these two together and then added the image with dimensionals. I added a bow using ⅜” Sheer Ribbon in Bubble Bath (from Combo back that includes 3 spools) and then silver Simply Elegant Trim for the hanger. I finished this one with silver Festive Pearls – CUTE!
Supplies Used:
- Cardstock – Very Vanilla, Basic White, Coastal Cabana
- Fluffiest Friends Bundle
- Brightest Glow Stamp Set
- Very Best Trio Punch
- Cheery Patterns Embossing Folders (set of 2)
- Stylish Shapes Dies
- Boho Blue Stampin’ Pad
- Memento Tuxedo Black Ink
- Boho Blue Stampin’ Blends Combo
- Gray Granite Stampin’ Blends Combo
- Pool Party Stampin’ Blends Combo
- Bubble Bath Stampin’ Blends Combo
- Poppy Parade Stampin’ Blends Combo
- Granny Apple Green Stampin’ Blends Combo
- Daffodil Delight Stampin’ Blends Combo
- Simply Elegant Trim Set (Silver & Gold)
- ⅜” Sheer Ribbon Combo Pack (Azure Afternoon, Bubble Bath, Lemon Lolly)
- Festive Pearls
- Stampin’ Cut & Emboss Machine
- Paper Trimmer
- Stampin’ Dimensionals
- Stampin’ Seal +
- Take Your Pick Tool
- Fiskars Hole punch
One More Thing about Gift Tags – Look Beyond the Obvious with your Die Sets!
As you see, you don’t even have to use “Tag” dies to make handmade tags. But sometimes, it is nice to have some added “fancy” to them. My favorite two tag die sets are Something Fancy and Tailor Made Tags. These are great for quick and easy tags, but I do like looking at other options.
Something different.
I don’t have every current die set from Stampin’ Up! I have a lot, but definitely not all of them. So the list below is what I compiled in looking through those that I personally have. You may have others. I encourage you to take a look at what you have and how you can use them “outside the box”. Beyond their intended use.
- Merriest Trees – has a great tag die
- Sending Cheer – a rectangle tag as well as shaped tags
- Autumn Leaves – labels can be tags
- Bag of Bones – what about that headstone shape… looks like a tag to me!
- Countryside Corners – lop off the bottom and these are GREAT tags in all sizes!
- Timeless Arrangements – three nice labels that make great tags!
- Deckled Rectangles – any set of shapes can be tags
- Labels Aglow – one in particular that has nice scrollwork on each end
- Scalloped Contours – these can make very fancy tags
- Stylish Shapes – again, any set of shapes can be tags
Don’t forget your punches too! Any of the Circle punches make great tags. And of course as I’ve shown you here, the Very Best Trio punch can turn any rectangle into a cute tag!
Happy Crafting Friends!
Teresa

Leave a comment